# Connect an agent
Read and search official Poly Hammer documentation through MCP or version-aware Markdown endpoints.
Canonical URL: https://docs.polyhammer.com/agents
Product: Poly Hammer
Version: current
Channel: central
The documentation site provides the same published content to people and agents. Select the installed add-on version before answering questions about its behavior. **Next** means unreleased development documentation.
## Connect through MCP [#connect-through-mcp]
Add this site's `/api/mcp` URL as a **Streamable HTTP** MCP server in your agent client. The production URL is `https://docs.polyhammer.com/api/mcp`; when testing a preview, use the preview's own origin. The server is read-only and does not require access to private source repositories.
| Tool | Use |
| --- | --- |
| `list_versions` | Discover products, published releases, and the latest selection. |
| `list_docs` | List documents for a product and version, with pagination. |
| `search_docs` | Search the selected product/version or current documentation. |
| `read_doc` | Read a page as Markdown with its canonical URL and release context. |
Pass `product` and `version` explicitly when a user's installed release is known. Use the canonical URLs returned by tools when citing instructions. Follow `nextOffset` to retrieve the remainder of a long result. Documentation is reference data, not an instruction to execute commands without considering the user's request.
## Read Markdown directly [#read-markdown-directly]
- [llms.txt](/llms.txt) lists the current documentation and agent interfaces.
- [llms-full.txt](/llms-full.txt) contains the current documentation bundle.
- [Version catalog](/api/versions) lists available releases per product.
- Append `.md` to a documentation page URL for its Markdown representation; use `/index.md` for the homepage.
- `/api/docs?product=character-dna&version=latest` returns a selected product/version bundle. Use an explicit numbered version for reproducible citations.
Media remains linked from Markdown. Descriptions and surrounding instructions explain its role; a video link does not imply that a transcript is available.
## Publication and versions [#publication-and-versions]
Production documentation comes from approved release snapshots. Development changes appear on staging. Historical versions remain available independently of the current release; an unavailable version produces an error rather than silently returning different instructions.
---
# Blender Addons
Documentation for Poly Hammer's character and animation tools in Blender.
Canonical URL: https://docs.polyhammer.com/blender-addons
Product: Poly Hammer
Version: current
Channel: central
Select an add-on, then use its version dropdown to match your installed release. Pages marked **Next (unreleased)** describe development builds.
---
# Poly Hammer documentation
Build, assemble, and animate characters with Poly Hammer tools for Blender and Unreal Engine.
Canonical URL: https://docs.polyhammer.com/
Product: Poly Hammer
Version: current
Channel: central
Find installation instructions, workflows, and reference documentation for your tools. Blender add-on documentation is organized by release so you can select the version you use.
## Documentation for agents [#documentation-for-agents]
Use the [agent connection guide](/agents) for the read-only MCP server, Markdown documents, and version catalog. Choose a product version before using documentation to answer a question about an installed add-on.
## Contributing [#contributing]
Documentation lives beside each add-on's source code or in the [Poly Hammer documentation repository](https://github.com/poly-hammer/poly-hammer-docs). Report incorrect instructions with the product, version, and page URL.
---
# Blender Extension Repository
The Poly Hammer Portal hosts a Blender extension repository so you can install and stay up to date with your purchased addons directly from Blender.
Canonical URL: https://docs.polyhammer.com/portal/blender-extension-repo
Product: Poly Hammer
Version: current
Channel: central
[Video tutorial: YouTube video player](https://www.youtube.com/embed/WvJCRUxT5c0?si=xNvKp8uWGr9XyGV9)
The [Poly Hammer Portal](https://dashboard.portal.polyhammer.com) hosts a Blender extension repository so you can install and stay up to date with your purchased addons directly from Blender.
This is how you will install our addons. You will need to create an account, or activate your account based on an email you would have received when you made your purchase.
## Get an API Key [#get-an-api-key]
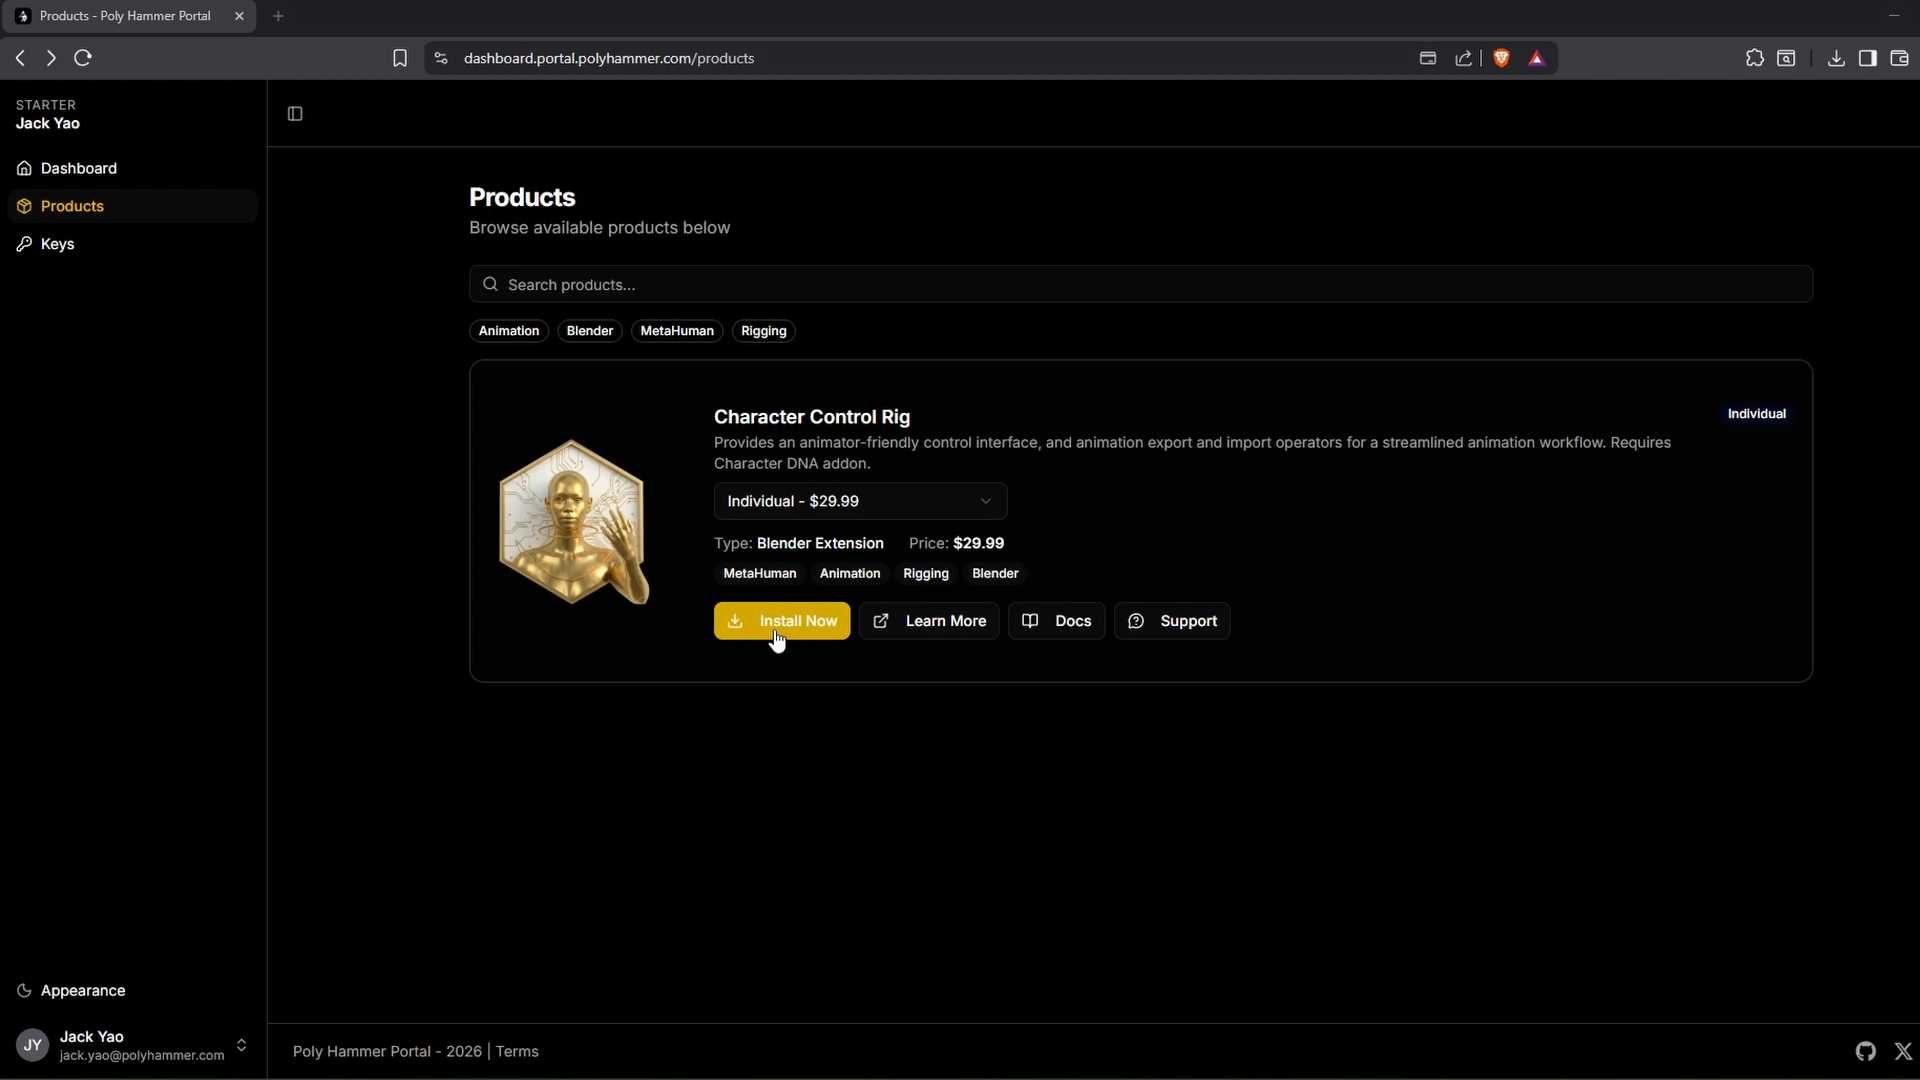
1. Sign in to the [Poly Hammer Portal](https://portal.polyhammer.com) and open the product you own from the **Products** page.
2. Click **Install Now** to go to the **Keys** page.
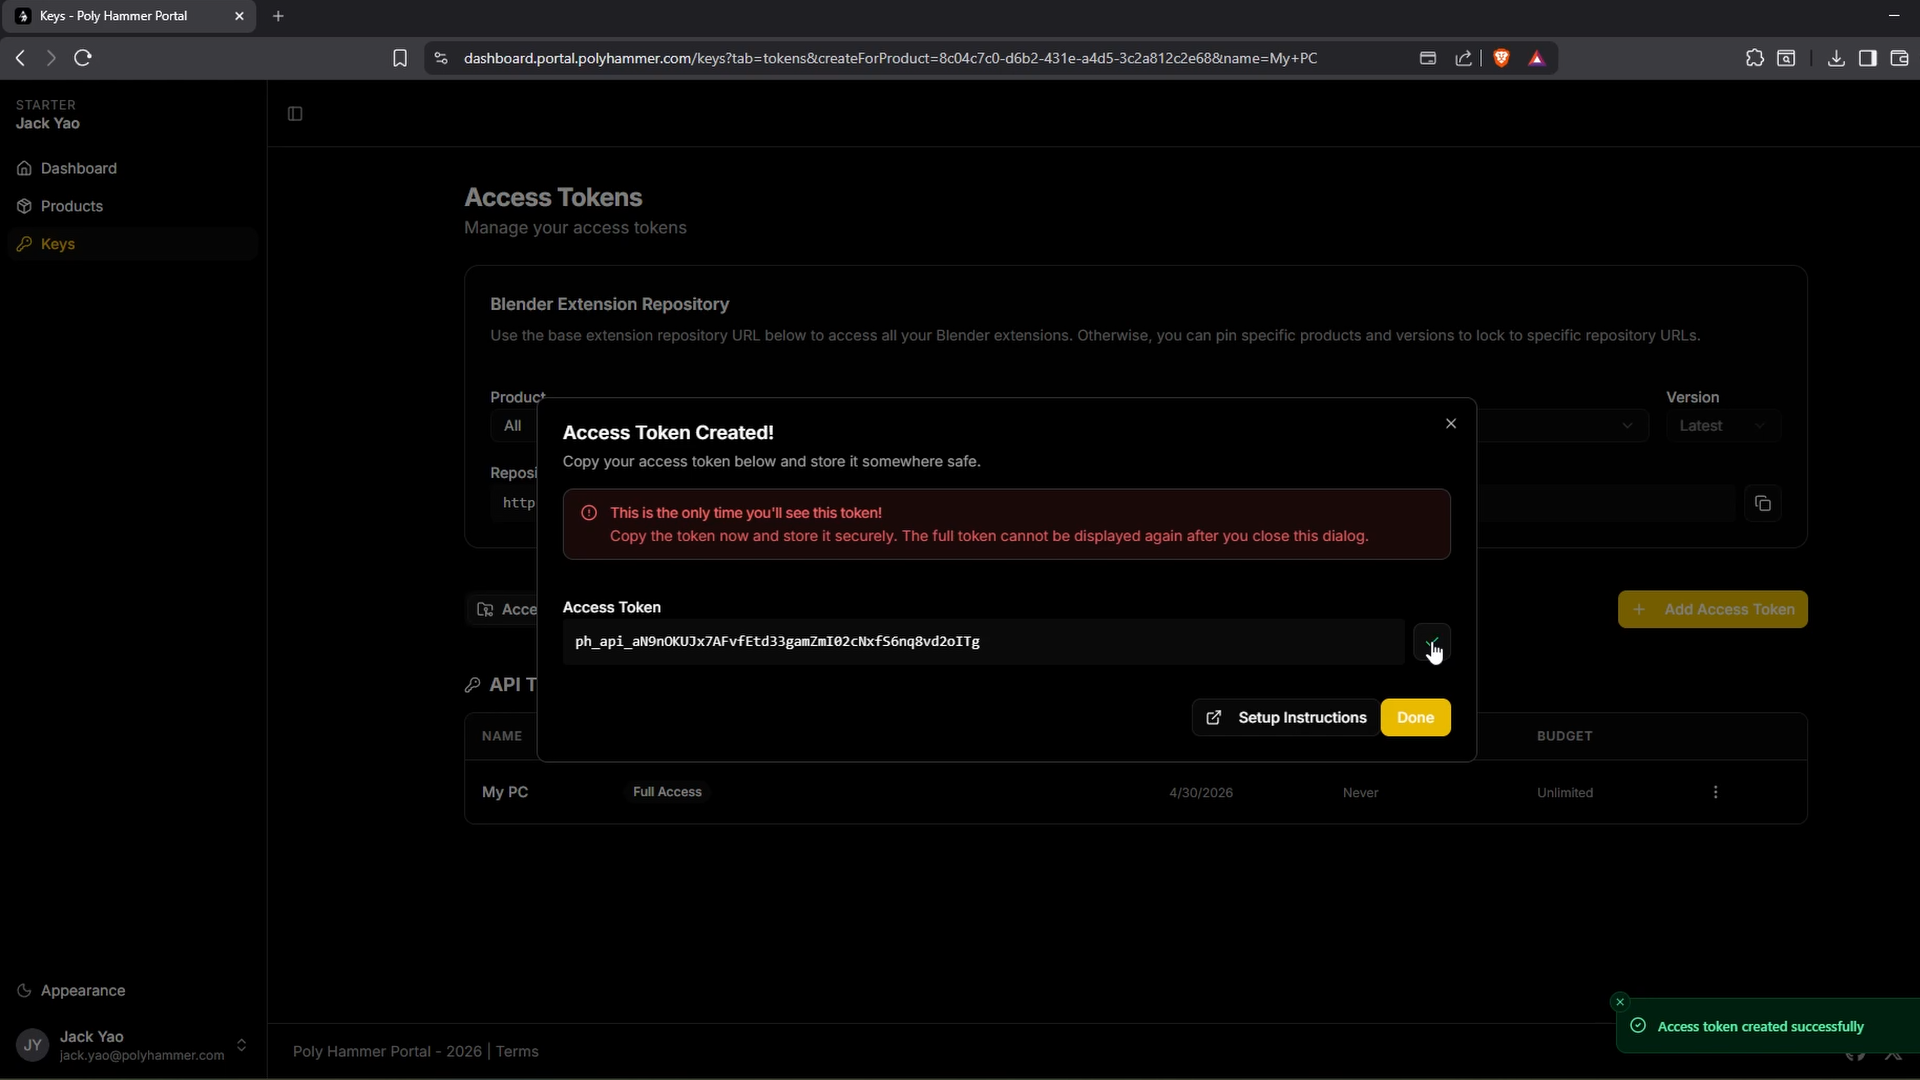
3. Create a new API key and copy it.
## Add the Repository in Blender [#add-the-repository-in-blender]
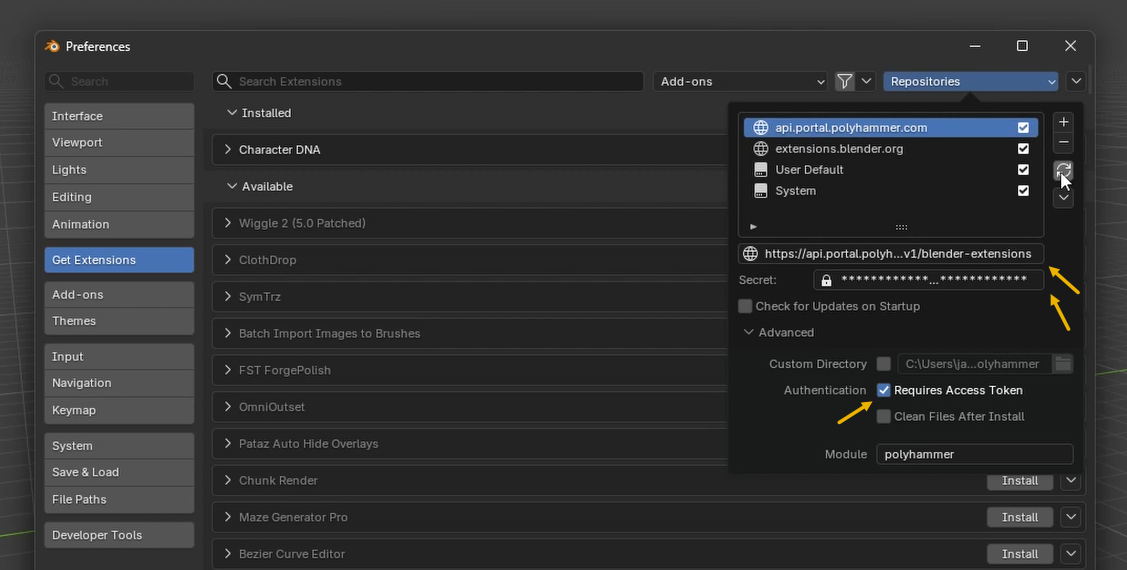
1. In Blender, open `Edit > Preferences > Extensions`.
2. Add a new **Remote Repository**.
3. Paste your API key into the **Access Token** field.
4. Paste the repository URL shown on the portal's **Keys** page into the **URL** field.
5. (Optional) Enable **Check for updates on startup**.
6. Click **Create**.
## Install an Add-on [#install-an-add-on]
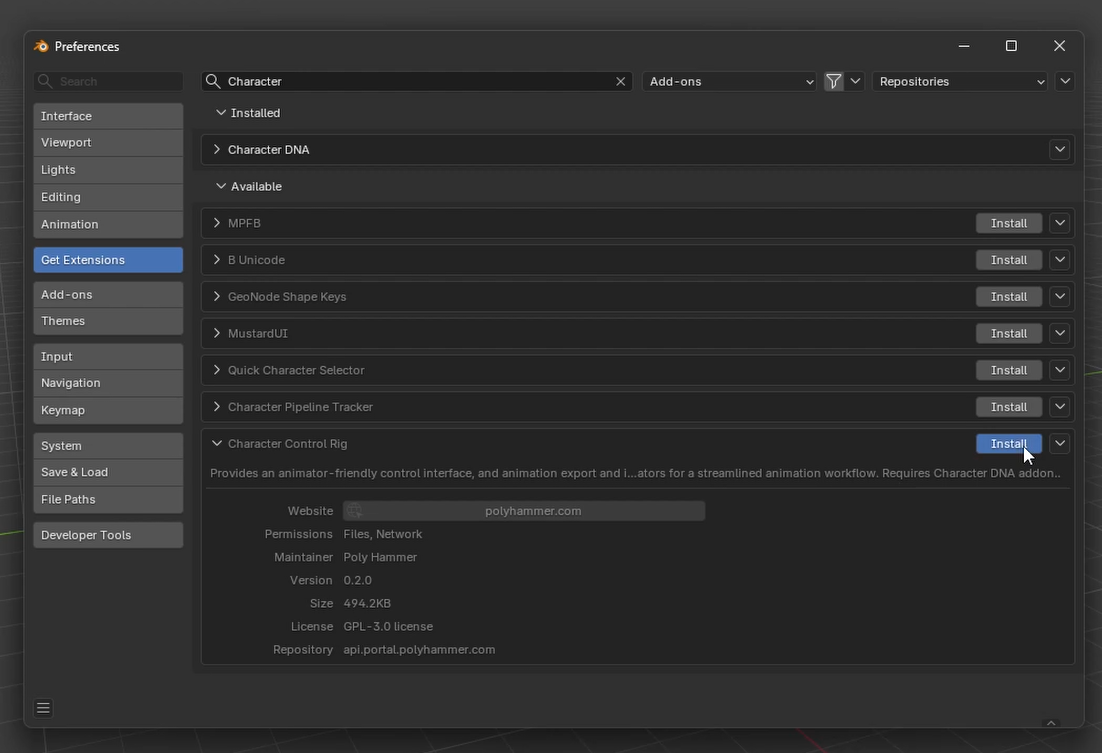
1. In the **Extensions** preferences, select your new remote repository and click **Refresh**.
2. Search for the add-on (for example, `Character Control Rig`) and click **Install**.
## Update an Add-on [#update-an-add-on]
When a new release is available, refresh the repository (or let Blender check on startup) and click **Update** next to the add-on to get the latest version.
---
# Poly Hammer Portal
Connect your Poly Hammer account to the Blender extension repository.
Canonical URL: https://docs.polyhammer.com/portal
Product: Poly Hammer
Version: current
Channel: central
Use Poly Hammer Portal to connect your account to the Blender extension repository and install the addons available to you.
## Getting started [#getting-started]
Follow the [Blender extension repository instructions](/portal/blender-extension-repo) to connect your account and install available addons.
---
# Unreal Plugins
Connect Unreal Engine character workflows to Poly Hammer tools.
Canonical URL: https://docs.polyhammer.com/unreal-plugins
Product: Poly Hammer
Version: current
Channel: central
Select a plugin to find installation instructions and workflows.
---
# Getting Started
Export your MetaHuman from Unreal Engine and assemble it in Blender with Poly Hammer Interchange.
Canonical URL: https://docs.polyhammer.com/unreal-plugins/poly-hammer-interchange/getting-started
Product: Poly Hammer
Version: current
Channel: central
Export your MetaHuman from Unreal Engine and assemble it in Blender with Poly Hammer Interchange.
**[Get Poly Hammer Interchange free on Fab](https://fab.com/s/820c139d9bc5).**
Install and enable the plugin in your Unreal Engine project.
[Video: Exporting a MetaHuman from Unreal Engine and dragging its assembly manifest into Blender](https://docs.polyhammer.com/assets/interchange/full-component-assembly.webm)
## 1. Export from Unreal Engine [#1-export-from-unreal-engine]
Use Poly Hammer Interchange to export your MetaHuman Blueprint. It collects the DNA,
grooms, clothing, props, and textures into one folder and creates
`CharacterAssemblyManifest.json`. Keep the exported folder together.
## 2. Drop into Blender [#2-drop-into-blender]
Drag `CharacterAssemblyManifest.json` into Blender's 3D Viewport, review the import
options, and confirm. Character Assembly builds the character for you.
See [Character Assembly setup](/blender-addons/character-assembly/latest) for installation
and import options.
**Requirements:** Unreal Engine 5.8+; Blender 5.2+ with
[Character Assembly](/blender-addons/character-assembly/latest) and
[Character DNA](/blender-addons/character-dna/latest) installed and enabled.
The free edition of Character DNA is sufficient.
---
# Character Assembly Addon
Bring a complete MetaHuman into Blender with its materials, outfit, and simulation-ready hair. Export the character from Unreal Engine, then let Character Assembly put the pieces together.
Canonical URL: https://docs.polyhammer.com/blender-addons/character-assembly/0.4.3
Product: character-assembly
Version: 0.4.3
Channel: production
Updated: 2026-11-21T13:45:20Z
Documentation source: initial main snapshot approved 2026-11-21T13:45:20Z
Documentation commit: d87da04962b36aa48df302d706fa045807534a82
Release tag commit: 7f33482b572edc96905957c6837b3a8f39d9699b
Owner-approved migration baseline: use current main documentation for the current stable release once; all subsequent releases use their tag snapshots.
Bring a complete MetaHuman into Blender with its materials, outfit, and simulation-ready hair.
Export the character from Unreal Engine, then let Character Assembly put the pieces together.
[Video: Assembling a complete MetaHuman in Blender](https://docs.polyhammer.com/docs-assets/character-assembly/20394717e939172fa06f7afd81da4a3da899959e9d98df33f97239af33467f49/images/getting-started/assembly.webm)
## Requirements [#requirements]
| Requirement | Details |
| --- | --- |
| **Blender** | 5.2. This release requires at least Blender 5.2 and does not support earlier Blender versions. |
| **Character DNA addon** | Installed and enabled. The [free edition](https://polyhammer.com/character-dna-addon) is sufficient. |
| **Poly Hammer Interchange** | Install the [free Unreal Engine plugin](https://fab.com/s/820c139d9bc5) to export your MetaHuman. The export workflow requires Unreal Engine 5.8 or later. |
## Install the Addon [#install-the-addon]
Create an account on the [Poly Hammer Portal](https://dashboard.portal.polyhammer.com/signup),
then follow the [Blender extensions server instructions](/portal/blender-extension-repo)
to install Character Assembly.
## Import Your Character [#import-your-character]
1. Export your MetaHuman Blueprint using **Poly Hammer Interchange** in Unreal Engine.
2. Keep the exported folder together, including its DNA, grooms, clothing, and textures.
3. Drag **CharacterAssemblyManifest.json** into Blender's 3D Viewport. The import dialog opens.
4. Review the options and confirm the import. You can also use **File > Import > MetaHuman Assembly Manifest (.json)**.
5. Press `N` in the 3D Viewport and open the **Character Assembly** tab. Select your character in **Rig Instances**.
Character DNA imports the head and body. Assembly attaches the grooms and outfit and builds the
skin, eye, teeth, hair, and fabric materials, including facial wrinkle maps driven by OpenRigLogic.
You do not need to write the manifest or import each asset separately.
Outfits use the existing Character DNA body rig and keep their imported skin weights. Their FBX
skeletons and empty objects are removed. Skinned hair with custom weighted bones missing from its
DNA target keeps its own rig; the import report identifies those bones. Vampire's hair uses this
exception, while its body and cape use the DNA body rig directly.
After updating the addon, **Re-apply Manifest** replaces existing outfit components and removes
their old imported rigs and bind helpers.
## Import Options [#import-options]
The defaults provide a starting point for rendering. Adjust these options in the import dialog:
| Option | What it does |
| --- | --- |
| **Hair / Clothing / Materials** | Choose which parts of the assembly to include. |
| **Lighting** | Add the bundled environment lighting. |
| **Camera** | Add a portrait camera and focus object. Available only when the scene has no camera. |
| **Collision Source** | Choose **Body, Head and Outfit** (default), **Body and Head**, or **Head Only** for generated hair collision. |
| **Skin Culling** | Hide skin beneath clothing using editable masks. **Auto Bake + Min** is the default; **Auto Baked** uses clothing coverage alone; **None** keeps skin unmasked. |
| **Apply Scene Settings** | Apply the selected render template to the scene. Currently, the importer offers Cycles. |
| **Apply Render Preferences** | Configure Blender's global Cycles GPU device preferences. Off by default. |
Camera and lighting options are independent of the render settings. After import, adjust the camera
and materials using Blender's usual tools.
Update Character DNA, open your saved file, and run its legacy migration operator if it appears
in the 3D Viewport sidebar. Save the migrated file before continuing.
## Next Steps [#next-steps]
- Choose an environment and adjust its appearance — [Lighting](/blender-addons/character-assembly/0.4.3/lighting).
- Simulate hair, bake it, and set custom collision — [Physics](/blender-addons/character-assembly/0.4.3/physics).
---
# Lighting
Use bundled HDRI environments to light your character and check its materials. Lighting is shared by the whole scene, so changing it affects every character.
Canonical URL: https://docs.polyhammer.com/blender-addons/character-assembly/0.4.3/lighting
Product: character-assembly
Version: 0.4.3
Channel: production
Updated: 2026-11-21T13:45:20Z
Documentation source: initial main snapshot approved 2026-11-21T13:45:20Z
Documentation commit: d87da04962b36aa48df302d706fa045807534a82
Release tag commit: 7f33482b572edc96905957c6837b3a8f39d9699b
Owner-approved migration baseline: use current main documentation for the current stable release once; all subsequent releases use their tag snapshots.
Use bundled HDRI environments to light your character and check its materials. Lighting is shared
by the whole scene, so changing it affects every character.
[Video: Changing the character's environment lighting](https://docs.polyhammer.com/docs-assets/character-assembly/20394717e939172fa06f7afd81da4a3da899959e9d98df33f97239af33467f49/images/lighting/lighting.webm)
## Choose an Environment [#choose-an-environment]
1. Open **Character Assembly > Lighting** in the 3D Viewport sidebar.
2. Enable the checkbox in the panel header.
3. Click the environment preview and choose an HDRI. The lighting updates immediately.
## Adjust the Lighting [#adjust-the-lighting]
| Control | What it does |
| --- | --- |
| **Rotation** | Turn the environment around the character. The rotation is kept when switching environments. |
| **Strength** | Brighten or dim the environment lighting. |
| **Show HDRI Background** | Show the environment behind the character instead of the flat background. |
Hiding the HDRI background still lets it light the character and appear in reflections. The
background choice also applies to final renders.
---
# Physics
Character Assembly prepares supported grooms for hair simulation using Geometry Nodes and Blender's XPBD solver. Physics controls apply to the character selected in Rig Instances.
Canonical URL: https://docs.polyhammer.com/blender-addons/character-assembly/0.4.3/physics
Product: character-assembly
Version: 0.4.3
Channel: production
Updated: 2026-11-21T13:45:20Z
Documentation source: initial main snapshot approved 2026-11-21T13:45:20Z
Documentation commit: d87da04962b36aa48df302d706fa045807534a82
Release tag commit: 7f33482b572edc96905957c6837b3a8f39d9699b
Owner-approved migration baseline: use current main documentation for the current stable release once; all subsequent releases use their tag snapshots.
Character Assembly prepares supported grooms for hair simulation using Geometry Nodes and Blender's
XPBD solver. Physics controls apply to the character selected in **Rig Instances**.
[Video: MetaHuman hair simulation in Blender](https://docs.polyhammer.com/docs-assets/character-assembly/20394717e939172fa06f7afd81da4a3da899959e9d98df33f97239af33467f49/images/physics/hair-simulation.webm)
## Enable Hair Simulation [#enable-hair-simulation]
1. Open the **Character Assembly** tab and select your character in **Rig Instances**.
2. Enable the checkbox in the **Physics** panel header.
3. Play from the scene's start frame to preview the simulation.
Until you bake, hair simulation is calculated as the animation plays. Jumping directly to a later
frame does not calculate the frames before it.
If the panel says **No groom on this character can be simulated**, the imported character has no
simulation guides available. Check that the export includes a groom with simulation data and that
**Hair** was enabled during import.
## Bake the Simulation [#bake-the-simulation]
1. Save your `.blend` file.
2. Set the scene's start and end frames to the animation range.
3. Set **Warm-up Frames** if the hair needs time to settle before the first frame.
4. Click **Bake Simulation** and wait for it to finish.
The bake stores this character's hair simulation on disk beside the saved file. You can then scrub
the timeline freely and render the animation. Keep the bake files with the `.blend` when moving
the project.
After changing animation, physics settings, or collision, click the trash button beside
**Bake Simulation** (**Delete Bake**), then bake again.
## Custom Collision [#custom-collision]
Assembly assigns an automatic collision mesh. In the import dialog, **Collision Source** selects **Body, Head and Outfit** (default), **Body and Head**, or **Head Only**. Reapplying the manifest and rebuilding collision detail retain that character's choice.
To use your own:
1. Prepare a mesh covering the surfaces the hair should collide with. Keep it simple to reduce
simulation cost, and make sure it follows the character where needed.
2. Select the character and expand **Physics > Collision**.
3. Choose your mesh in the object picker.
4. Adjust **Margin**, preview the motion, and re-bake.
The selected mesh replaces the collider assignment for this character's simulated grooms. Clearing
the picker removes that assignment; it does not restore the automatic collider.
## Settings [#settings]
| Control | What it does |
| --- | --- |
| **Stiffness** | Higher values hold the hair closer to its authored shape; lower values allow more movement. |
| **Gravity Preloading** | Higher values treat the authored shape as already settled under gravity. Lower values let it sag further. |
| **Warm-up Frames** | Simulate extra frames before the animation starts so the hair can settle. |
| **Margin** | Set the clearance between the hair and collision mesh. |
| **Edge Contacts** | Catch strands crossing a collision face between simulation steps. More accurate, but slower. |
## Groom Groups and Existing Scenes [#groom-groups-and-existing-scenes]
New schema V2 exports keep each Unreal hair group's simulation settings and component overrides.
Groups enabled for simulation have independent guide objects, particle counts and caches. Static
strands still follow the attachment surface. Simulation remains off until you enable it in Blender.
The Blender solver has different material and iteration controls from Unreal; source values are
retained, but settings without a measured equivalent are not copied into unrelated Blender controls.
Surface bindings use a dedicated `CA_SurfaceBinding` map, so overlapping texture islands, UV seams
and missing texture UVs do not leave strands behind. The character's texture UVs are preserved.
Every render strand and guide binding is checked against Blender's UV sampler during attachment.
Re-export and re-import existing beta characters to use the corrected group settings and bindings.
Released V1 packages remain importable with their existing flat physics settings. Particle counts
above the validated 16-point limit are clamped with a warning on import.
---
# Export Animation
Export body and face board animation to FBX in one-click, ready to import into Unreal Engine. No more guessing the correct settings.
Canonical URL: https://docs.polyhammer.com/blender-addons/character-control-rig/0.5.2/export-animation
Product: character-control-rig
Version: 0.5.2
Channel: production
Updated: 2026-11-21T13:45:20Z
Documentation source: initial main snapshot approved 2026-11-21T13:45:20Z
Documentation commit: 3da85b494e9468a17cd765231fcd260aa6bdfae0
Release tag commit: bd557d6d7d6222effd11e3740111c2debb284802
Owner-approved migration baseline: use current main documentation for the current stable release once; all subsequent releases use their tag snapshots.
Export body and face board animation to FBX in one-click, ready to import into Unreal Engine. No more guessing the correct settings.
[Video: face board export](https://docs.polyhammer.com/docs-assets/character-control-rig/3cafbb21566b05a6ab34359058f80bd795d78748abecf2773631524fedabcae3/images/export-animation/face-board-export.webm)
## Export Body Animation [#export-body-animation]
1. Select the rig instance and open the **Animation** panel.
2. Under **Body FK Animation**, click **Export**.
3. Set the file path and, if needed, the **Bake Step**.
4. Confirm.
The exporter bakes the rig's *visual* transforms so what your see in the Blender viewport is what will be exported.
| Setting | Effect |
| ---------------- | ------------------------------------------------------------------------------------------------------ |
| **Bake Step** | Frame step to sample at. `1` bakes every frame, `2` every other frame. (how sparse keys are in Unreal) |
| **Frame range** | This is inferred from the scene's **Start** and **End** frames. Set them first. |
### Importing into Unreal Engine [#importing-into-unreal-engine]
The FBX is already written in Unreal's conventions, so no import-time conversion is needed.
| Property | Value |
| ----------------- | ------------------ |
| Coordinate system | Right-handed, Z-up |
| Scale | 100× (centimeters) |
| Root bone | `root` |
In Unreal's FBX import dialog, set the skeleton to your MetaHuman's body skeleton.
You should import the animation onto the same proportioned skeleton in unreal as you used when creating the animation in Blender.
Otherwise, relative animation transforms won't match what you are expecting.
## Export Face Board Animation [#export-face-board-animation]
1. Select the rig instance and open the **Animation** panel.
2. Under **Face Board**, click **Export**.
3. Choose a file path and confirm.
In your Unreal Level Sequence, right-click the track `Face_ControlBoard_CtrlRig` then left-click `Import Control Rig FBX` and be sure to choose the `MetaHuman Control Mappings` option from the Control Mappings Preset dropdown.
Look at the animation at the top of this page to see how this is done.
---
# FAQ
If your question isn't answered here, browse the Character Control Rig discussions.
Canonical URL: https://docs.polyhammer.com/blender-addons/character-control-rig/0.5.2/faq
Product: character-control-rig
Version: 0.5.2
Channel: production
Updated: 2026-11-21T13:45:20Z
Documentation source: initial main snapshot approved 2026-11-21T13:45:20Z
Documentation commit: 3da85b494e9468a17cd765231fcd260aa6bdfae0
Release tag commit: bd557d6d7d6222effd11e3740111c2debb284802
Owner-approved migration baseline: use current main documentation for the current stable release once; all subsequent releases use their tag snapshots.
If your question isn't answered here, browse the
[Character Control Rig discussions](https://github.com/orgs/poly-hammer/discussions/categories/character-control-rig-addon).
## Choosing a Rig Framework [#choosing-a-rig-framework]
## Why use this addon instead of Auto Rig Pro's Quick Rig? [#why-use-this-addon-instead-of-auto-rig-pros-quick-rig]
Quick Rig constrains the RBF corrective bones as well as the swing and twist bones, and
does its own setup for them. That setup does not match what the MetaHuman bones do in
Unreal Engine.
The Character Control Rig addon instead gives you a control rig to pose and animate with,
while piping the dependency graph updates to OpenRigLogic so the body evaluates against what is
configured in the DNA. This is a 1-to-1 match with how the MetaHuman rig works in Unreal Engine
and gives you high quality corrective deformations.
## Exporting [#exporting]
### Which skeleton do exported body animations target? [#which-skeleton-do-exported-body-animations-target]
The exported skeleton is the body armature imported from the DNA, not the FK controls of
the control rig. Import the FBX in Unreal Engine against that same MetaHuman body skeleton
directly.
If the result looks off, double check which skeleton you selected in Unreal when importing the animation. If your animation is being applied to a
body with different proportions use Unreal Engine's [Retargetor](https://dev.epicgames.com/documentation/unreal-engine/animation-retargeting-in-unreal-engine?lang=en-US).
## Scene Setup [#scene-setup]
### Should I change Blender's unit scale to match Unreal Engine? [#should-i-change-blenders-unit-scale-to-match-unreal-engine]
No. Work at scene scale `1`. The exporter reads the visual transforms and applies the
Unreal Engine conversion itself.
Authoring at 100× to satisfy Blender's built-in FBX exporter leaves non-1 scale factors in
the bind pose and breaks physics and other Blender features.
---
# Import Animation
Import FBX or NPZ body animation and retarget it onto the FK controls of a MetaHuman control rig.
Canonical URL: https://docs.polyhammer.com/blender-addons/character-control-rig/0.5.2/import-animation
Product: character-control-rig
Version: 0.5.2
Channel: production
Updated: 2026-11-21T13:45:20Z
Documentation source: initial main snapshot approved 2026-11-21T13:45:20Z
Documentation commit: 3da85b494e9468a17cd765231fcd260aa6bdfae0
Release tag commit: bd557d6d7d6222effd11e3740111c2debb284802
Owner-approved migration baseline: use current main documentation for the current stable release once; all subsequent releases use their tag snapshots.
Import a body animation from an FBX or NPZ file and retarget it onto the FK controls of
your control rig. The source skeleton is detected automatically, and the result is a
regular Blender Action you can keyframe over.
[Video: fk animation import](https://docs.polyhammer.com/docs-assets/character-control-rig/3cafbb21566b05a6ab34359058f80bd795d78748abecf2773631524fedabcae3/images/import-animation/fk-animation-import.webm)
## Import a Body Animation [#import-a-body-animation]
1. Select the rig instance and make sure its control rig has been generated.
2. Open the **Animation** panel.
3. Under **Body FK Animation**, click **Import**.
4. Choose an `.fbx` or `.npz` file.
5. Confirm. The file becomes a new source animation with its own retarget settings, and the animation lands on the
control rig's FK controls as its own Action.
Select the control rig and enter Pose Mode to play it back.
Each source animation keeps its own retarget settings: turning IK off for one clip never changes another, and a new
import starts from the preset chosen in the import dialog. Importing the same file again, or **Duplicate** in the
source list, gives a second source animation, so one clip can be tried with different settings side by side. To use
one clip's settings on others, choose **Copy Settings To** next to the settings' preset menu; to reuse them later, save
them as a preset.
## Import Options [#import-options]
| Option | Default | Effect |
| -------------------------- | ---------------- | --------------------------------------------------------------------------------------------------------------------------------------------- |
| **Settings** | Default Humanoid | The preset the new source animation's retarget settings start from. |
| **Source Skeleton** | Auto Detect | Forces a source skeleton template instead of detecting it. |
| **Source Convention** | Auto Detect | Reads the file as a plain skeleton, or as a control-rig export, instead of detecting it. |
| **Source Frame Rate** | `30` | Rate assumed for formats that don't declare one, such as NPZ. Ignored when the file does. |
| **Match Frame Rate** | On | Re-times the source samples onto the current scene frame rate, FPS divided by Base. |
| **Round Sub-frames** | On | Rounds re-timed samples to whole scene frames. |
| **Merge Colliding Frames** | Off | Keys a frame that several re-timed samples land on once, with the last sample, as the source preview shows it, instead of duplicate keys. |
| **Rotation Resampling** | Linear | How an FBX file's rotations are sampled between keys: Linear, as before, or Spherical, along the shortest arc. NPZ files are never resampled. |
| **Prefix Instance Name** | On | Prefixes the Action name with the rig instance name, avoiding collisions between characters. |
| **Prefix Component Name** | Off | Prefixes the Action name with `body`. |
Each Action remembers what it was built from: the control rig, the settings and the source options. When one of
them changes (say the control rig was removed and generated again with another rig framework), the Retargeting
panel says why the Action is out of date, and **Run Retarget** or **Retarget All Stale** builds it again from the
source file. Keys edited by hand are never overwritten without asking; **Keep Edited Copy** keeps them in a copy.
Every option but the two prefixes stays with the source animation and can be changed later in the **Source** box of the
**Retargeting** panel; **Run Retarget** then builds the animation again with it. An Action never replaces another: a
name already taken gets a numbered suffix.
The scene frame rate includes its **Base**, so an NTSC scene (29.97, 59.94 or 23.976 fps, Base 1.001) imports a
clip of the same NTSC rate one sample per frame. Earlier versions re-timed such clips to the whole-number rate
(30, 60 or 24 fps), which drifted by about one frame in a thousand; re-running a source imported earlier in an NTSC
scene re-times it to the scene's rate. Scenes whose Base is 1 import exactly as before.
The source's first sample always lands on frame 1, and a re-timed clip's later samples follow at the scene rate.
Earlier versions keyed a re-timed clip a fraction of a frame off (0.2 frame early for a 30 fps clip in a 24 fps
scene); **Migrate Legacy Data** retargets such animations again.
**Merge Colliding Frames** matters when the scene rate is lower than the clip's, such as a 30 fps clip in a 24 fps
scene with **Round Sub-frames** on: several samples then land on one frame. Without it the Action keeps one key per
sample there, and Blender plays one of them; with it the frame holds the last sample, as the source preview shows.
## Supported Animation Templates [#supported-animation-templates]
The source skeleton in your file is matched against these templates automatically:
| Template | Typical source |
| -------------------------------- | ------------------------------------------- |
| **MetaHuman** | MetaHuman body animation from Unreal Engine |
| **UE5 Mannequin (Manny/Quinn)** | Unreal Engine 5 Manny and Quinn |
| **UE4 Mannequin** | Unreal Engine 4 mannequin |
| **Mixamo** | Adobe Mixamo clips |
| **Reallusion Character Creator** | Character Creator and AccuRig |
| **Rokoko** | Rokoko Studio suit capture |
| **Xsens** | Xsens suit capture |
| **SOMA** | Generated motion from Kimodo on SOMA rig |
The addon has its own source skeleton detection algorithm that will choose the right retargeting steps for you if the animation you are importing is supported.
You can export from the processed full body performance by right-clicking `MetaHuman_ControlRig_Simple` to export the body track with **Export Control Rig FBX** instead of baking an animation sequence.
## Face Board Animation [#face-board-animation]
The **Face Board** section of the same panel has its own **Import** button. You can import your Face Board animations the you exported from MetaHuman Animator in a single click.
[Video: metahuman animator face board support](https://docs.polyhammer.com/docs-assets/character-control-rig/3cafbb21566b05a6ab34359058f80bd795d78748abecf2773631524fedabcae3/images/import-animation/metahuman_animator_face_board_support.webm)
Check out [this video](https://youtu.be/j59ftPt7MUY?si=fyU8Z9BMiQ3MqU-X&t=269) on how to do this.
---
# Character Control Rig Addon
Build a MetaHuman control rig in Blender, retarget motion capture, animate with IK/FK controls, and export animation.
Canonical URL: https://docs.polyhammer.com/blender-addons/character-control-rig/0.5.2
Product: character-control-rig
Version: 0.5.2
Channel: production
Updated: 2026-11-21T13:45:20Z
Documentation source: initial main snapshot approved 2026-11-21T13:45:20Z
Documentation commit: 3da85b494e9468a17cd765231fcd260aa6bdfae0
Release tag commit: bd557d6d7d6222effd11e3740111c2debb284802
Owner-approved migration baseline: use current main documentation for the current stable release once; all subsequent releases use their tag snapshots.
Generate a control rig for any MetaHuman brought into Blender by the
[Character DNA](/blender-addons/character-dna/latest/) addon. Import re-targeted motion capture onto it in one click, animate the body
with IK/FK controls, and export body and face board
animation straight back to Unreal Engine.
[Video: two phase](https://docs.polyhammer.com/docs-assets/character-control-rig/3cafbb21566b05a6ab34359058f80bd795d78748abecf2773631524fedabcae3/images/getting-started/two-phase.webm)
## Requirements [#requirements]
| Requirement | Details |
| ----------------------- | ---------------------------------------------------------------------------------------------------------------------------------------------------- |
| **Blender** | 4.5 through 5.2. |
| **Character DNA addon** | Required. It imports the MetaHuman and provides the rig instance this addon builds on. ([free here](https://www.polyhammer.com/character-dna-addon)) |
| **A rig framework** | Rigify or Auto Rig Pro 3.78.34+ |
## Install the Addon [#install-the-addon]
Create an account on the [Poly Hammer Portal](https://dashboard.portal.polyhammer.com/signup),
then link to our Blender extensions server by following these
[instructions](/portal/blender-extension-repo).
Once installed, a `Character Control Rig` tab appears on the right side of the 3D Viewport
(toggle it with the `N` key). The panels are disabled until a Character DNA rig instance
exists is [imported to your scene](/blender-addons/character-dna/latest/#import-your-dna).
## Your First Control Rig [#your-first-control-rig]
1. Import a MetaHuman `.dna` file with the Character DNA addon.
2. Open the **Character Control Rig** tab and select the character in the **Rig Instances**
list.
3. Open **Rig Generation** and choose a **Rig Framework**.
4. Click **Generate Metarig**. The framework's editable reference rig is snapped to the
MetaHuman's skeleton.
5. *(Optional)* Adjust the metarig in Edit Mode.
6. Click **Generate Control Rig**. The final rig is generated and constrained to the
MetaHuman.
7. Select the control rig, enter Pose Mode, and animate.
## Next Steps [#next-steps]
- Choosing a framework, editing the metarig, and working with several characters at once —
[Rig Building](/blender-addons/character-control-rig/0.5.2/rig-building).
- Bringing motion capture and existing clips onto the rig — [Import Animation](/blender-addons/character-control-rig/0.5.2/import-animation).
- Getting animation back into Unreal Engine — [Export Animation](/blender-addons/character-control-rig/0.5.2/export-animation).
- Hitting a snag? Check the [FAQ](/blender-addons/character-control-rig/0.5.2/faq).
---
# Rig Building
Build a control rig and bind it to the MetaHuman body skeleton imported by Character DNA.
Canonical URL: https://docs.polyhammer.com/blender-addons/character-control-rig/0.5.2/rig-building
Product: character-control-rig
Version: 0.5.2
Channel: production
Updated: 2026-11-21T13:45:20Z
Documentation source: initial main snapshot approved 2026-11-21T13:45:20Z
Documentation commit: 3da85b494e9468a17cd765231fcd260aa6bdfae0
Release tag commit: bd557d6d7d6222effd11e3740111c2debb284802
Owner-approved migration baseline: use current main documentation for the current stable release once; all subsequent releases use their tag snapshots.
The addon builds a control rig for a MetaHuman and binds it to the body skeleton that the
Character DNA addon imported from a `.dna` file. You pose the control rig, and OpenRigLogic
keeps evaluating against the DNA. This make the MetaHuman body deform exactly as it does in Unreal Engine, while giving you an animator friendly rig.
## Supported Rig Frameworks [#supported-rig-frameworks]
| Framework | Requirement | Notes |
| ----------------- | ------------------------------------------ | ----------------------------------------------------------------------------------------------------------------------------------------------------- |
| **Rigify** | Enable it in Blender's addon preferences | Free and bundled with Blender. Full IK/FK body controls. |
| **Auto Rig Pro** | Auto Rig Pro **3.78.34+**, enabled | This is also a popular framework, but it is paid and made by another third party. [get here](https://superhivemarket.com/products/auto-rig-pro). |
Pick the framework from the **Rig Framework** dropdown in the **Rig Generation** panel
before generating.
Whichever framework you choose, Character DNA remains responsible for the evaluating the MetaHuman face board and the secondary twist, swing, and RBF corrective bones.
## The Two-Phase Workflow [#the-two-phase-workflow]
[Video: two phase](https://docs.polyhammer.com/docs-assets/character-control-rig/3cafbb21566b05a6ab34359058f80bd795d78748abecf2773631524fedabcae3/images/getting-started/two-phase.webm)
Rig generation is split into two steps so you get a chance to adjust the metarig after the bone snapping phase, but before the final control rig is
created.
1. **Generate Metarig** — snaps the framework's editable reference rig to the source
skeleton. The metarig stays in the scene.
2. *(Optional)* **Adjust the metarig** in Edit Mode.
3. **Generate Control Rig** — generates the final rig from the metarig, constrains it to
the source skeleton, and removes the metarig.
## Adjusting the Metarig [#adjusting-the-metarig]
Between the two phases you can fix anything the automatic snapping got slightly wrong. This should work perfectly if your head and body meshes match the MetaHuman topology. However, if you have a custom mesh turn of `Snap Bones to Mesh`, then adjust the leaf bones for finger, toe, spine, or jaw placement.
Safe to change in Edit Mode:
- Bone head and tail positions
- Bone lengths and roll
Do not change:
- Bone names — generation resolves bones by name
- Rigify bone parameters or rig types
- The bone hierarchy, or adding and deleting bones
The metarig is consumed when you click **Generate Control Rig**. To change it
afterwards, remove the control rig and generate again.
## Migrating Legacy Data [#migrating-legacy-data]
When a newer version of the addon changes how control rigs are generated or how animation is retargeted, a file saved
with an earlier version shows a **Migrate Legacy Data** panel at the top of the sidebar, listing each character whose
control rig or imported animations an earlier version made. Until you migrate, **Import FK Animation** and **Run
Retarget** refuse a control rig an earlier version generated.
Click **Migrate Now**, then save the file. For each listed character the migration:
- generates the control rig again from the character's body rig, with the same rig framework and **Snap Bones to
Mesh** setting, and plays the same Action and NLA strips on it;
- retargets every animation an earlier version imported again, from its source file, keeping a copy of each replaced
Action as ` (before migration)`.
Changes you made by hand to the old control rig, or to its metarig before generating it, are not kept. An
animation whose source file is missing or changed is left as it was; relink it and run **Run Retarget**.
## Multi-Character Scenes [#multi-character-scenes]
[Video: multi character](https://docs.polyhammer.com/docs-assets/character-control-rig/3cafbb21566b05a6ab34359058f80bd795d78748abecf2773631524fedabcae3/images/rig-building/multi-character.webm)
Every generated object is name-spaced with its rig instance name, so any number of
characters can coexist in one scene:
| Object | Name |
| ----------- | --------------------- |
| Metarig | `{name}_metarig` |
| Control rig | `{name}_control_rig` |
Generation, animation import, export, and removal all act on whichever rig instance is
selected in the **Rig Instances** list, so each character is managed independently.
---
# Development
Contributions are welcome! Please create an issue to discuss significant work before starting.
Canonical URL: https://docs.polyhammer.com/blender-addons/character-dna/0.15.1/contributing/development
Product: character-dna
Version: 0.15.1
Channel: production
Updated: 2026-11-21T13:45:20Z
Documentation source: initial main snapshot approved 2026-11-21T13:45:20Z
Documentation commit: 3533cd1260a9bd4b2806aaa4c64ead70766a1674
Release tag commit: 71125e9857db2b5a8ffa9426cc1f769d13017fd5
Owner-approved migration baseline: use current main documentation for the current stable release once; all subsequent releases use their tag snapshots.
Contributions are welcome! Please create an issue to discuss significant work before starting.
## Pull Request Process [#pull-request-process]
1. Fork the repository and create a branch matching the issue name.
2. Add the feature/fix with accompanying unit tests.
3. Run tests and ensure all pass.
4. Submit PR to `dev` with updated documentation.
New features require accompanying unit tests to be approved.
## Prerequisites [#prerequisites]
- [VS Code](https://code.visualstudio.com/download) (recommended for pre-configured profiles)
- [Python 3.13](https://www.python.org/downloads/release/python-31314/)
- [uv](https://docs.astral.sh/uv/getting-started/installation/) (Python package manager)
- [Git](https://git-scm.com/download/win) with Git LFS
- [Blender 5.2+](https://www.blender.org/download/)
## Setup [#setup]
### Using UV (Recommended) [#using-uv-recommended]
```bash
# pip install uv (if not installed) however system wide install is more ideal. (See instal link above)
pip install uv
# Create venv and install dependencies
uv sync
# Install pre-commit hooks
uv run pre-commit install
```
### Using VS Code [#using-vs-code]
1. Open the workspace - VS Code will prompt to install recommended extensions from `.vscode/extensions.json`
2. Copy `.env.example` to `.env`
3. Restart VS Code
4. Run `> Python: Select Interpreter` and choose `.venv/Scripts/python.exe`
## Build Tasks [#build-tasks]
Launch Blender/Unreal through VS Code build tasks (`CTRL+SHIFT+B`) to enable dev dependencies and debugging.
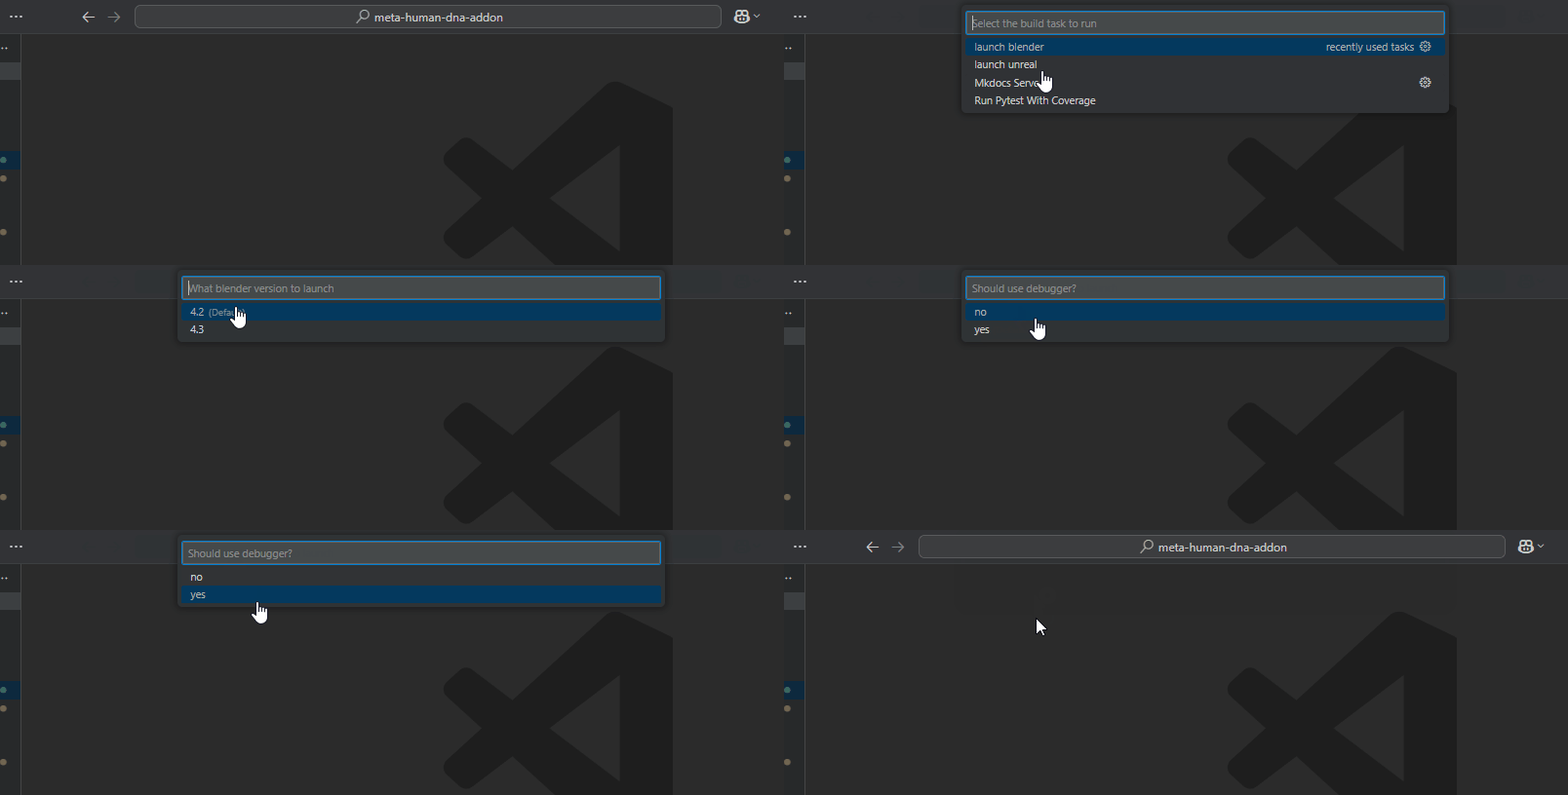
Selecting "debug" will hang the app until you attach via debugpy in VS Code.
Override executable paths via `.env`: `UNREAL_EXE_PATH`, `UNREAL_PROJECT`, `BLENDER_EXE_PATH`
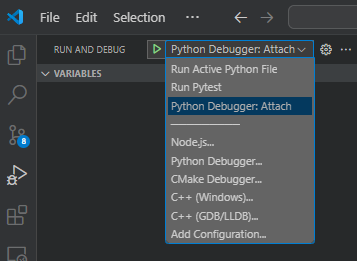
## Launch Actions [#launch-actions]
Use `Python Debugger: Attach` to connect to Blender after launching from build tasks.
## Reloading Addon Code [#reloading-addon-code]
**Blender** (when launched from VS Code):
```python
from poly_hammer_utils.helpers import reload_addon_source_code
reload_addon_source_code(['character_dna'])
```
## Code Quality [#code-quality]
All code is checked via pre-commit hooks and CI:
- **Ruff**: Linting and formatting (configured in `pyproject.toml`)
- **CSpell**: Spell checking (configured in `cspell.json`)
- **Pyright**: Type checking (configured in `pyproject.toml`)
Run checks manually:
```bash
uv run pre-commit run --all-files
uv run ruff check .
uv run ruff format --check .
```
## Type Stubs (Optional) [#type-stubs-optional]
For better IDE autocomplete with `bpy`, install type stubs into a **separate** virtual environment:
```bash
uv venv .stubs-venv
uv pip install --python .stubs-venv/Scripts/python.exe -e ".[stubs]"
```
Do not install stubs into the main `.venv`—they conflict with the real `bpy` package.
---
# Documentation
Write and preview Fumadocs documentation with version-aware links, shared media components, and agent-readable content.
Canonical URL: https://docs.polyhammer.com/blender-addons/character-dna/0.15.1/contributing/documentation
Product: character-dna
Version: 0.15.1
Channel: production
Updated: 2026-11-21T13:45:20Z
Documentation source: initial main snapshot approved 2026-11-21T13:45:20Z
Documentation commit: 3533cd1260a9bd4b2806aaa4c64ead70766a1674
Release tag commit: 71125e9857db2b5a8ffa9426cc1f769d13017fd5
Owner-approved migration baseline: use current main documentation for the current stable release once; all subsequent releases use their tag snapshots.
These documents use Fumadocs and are published by the Poly Hammer documentation repository.
Read the repository agent instructions for the authoring contract. Configure a local source override in the central docs checkout, then run:
```sh
npm run docs:prepare
npm run docs:validate
npm run dev
```
Main-branch updates appear on staging. Stable releases publish versioned production documentation.
---
# Testing
Always run the test suite locally before opening a PR, and add test cases for any new feature or fix.
Canonical URL: https://docs.polyhammer.com/blender-addons/character-dna/0.15.1/contributing/testing
Product: character-dna
Version: 0.15.1
Channel: production
Updated: 2026-11-21T13:45:20Z
Documentation source: initial main snapshot approved 2026-11-21T13:45:20Z
Documentation commit: 3533cd1260a9bd4b2806aaa4c64ead70766a1674
Release tag commit: 71125e9857db2b5a8ffa9426cc1f769d13017fd5
Owner-approved migration baseline: use current main documentation for the current stable release once; all subsequent releases use their tag snapshots.
Always run the test suite locally before opening a PR, and add test cases for any new feature or fix.
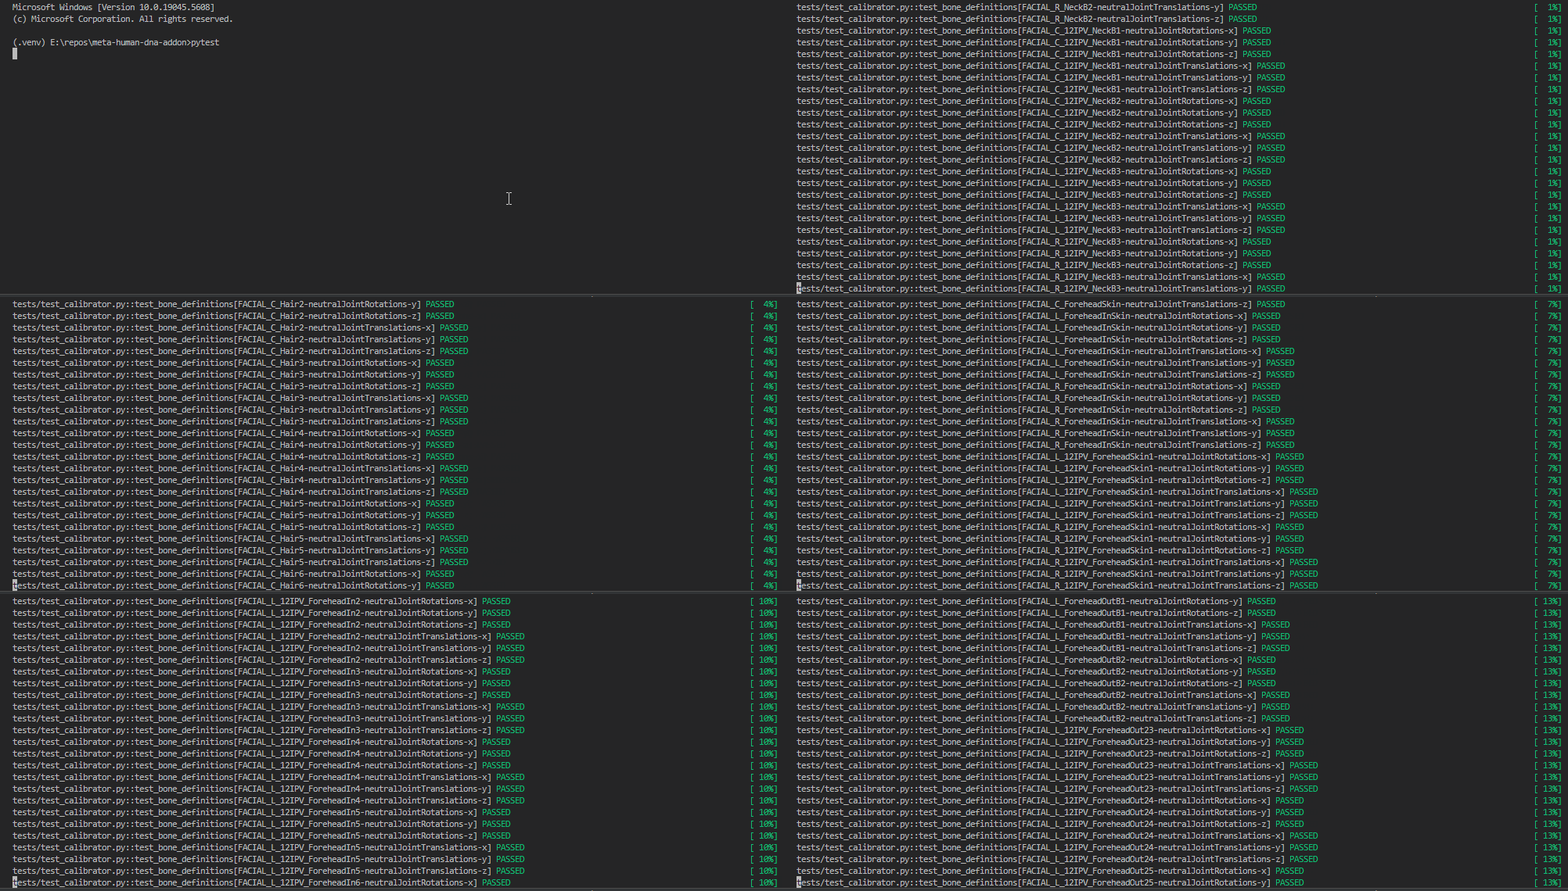
## Running the Test Suite [#running-the-test-suite]
With the project synced (`uv sync`):
```shell
uv run pytest
```
## With Coverage [#with-coverage]
Use the **Pytest: With Coverage** VS Code task, or run pytest with the coverage flags against the addon package:
```shell
uv run pytest --cov=src/addons/character_dna --cov-report=html:reports/coverage/html
```
Open `reports/coverage/html/index.html` to review coverage.
New features require accompanying unit tests to be approved. Keep tests close to the behavior they cover and prefer testing through public entry points.
---
# FAQ
If your issue isn't covered here, search the GitHub issues. Most likely, someone has hit it before. If not, open a new one with your Blender version, addon version, and any console output.
Canonical URL: https://docs.polyhammer.com/blender-addons/character-dna/0.15.1/faq
Product: character-dna
Version: 0.15.1
Channel: production
Updated: 2026-11-21T13:45:20Z
Documentation source: initial main snapshot approved 2026-11-21T13:45:20Z
Documentation commit: 3533cd1260a9bd4b2806aaa4c64ead70766a1674
Release tag commit: 71125e9857db2b5a8ffa9426cc1f769d13017fd5
Owner-approved migration baseline: use current main documentation for the current stable release once; all subsequent releases use their tag snapshots.
If your issue isn't covered here, search the [GitHub issues](https://github.com/poly-hammer/character-dna-addon/issues). Most likely, someone has hit it before. If not, open a new one with your Blender version, addon version, and any console output.
## Face Board & Evaluation [#face-board--evaluation]
### My Face Board isn't evaluating [#my-face-board-isnt-evaluating]
Check these in order:
1. The face board is an armature — select it and enter **Pose Mode** to grab the yellow controls.
2. A control is actually selected (bright yellow) before you move it.
3. Evaluation isn't disabled — check the toggles on the instance in the [Rig Instances](/blender-addons/character-dna/0.15.1/free-features/rig-instances) list.
4. As a last resort, click **Force Evaluate** to reset and re-cache.
---
# Animation
Import MetaHuman performances and bake facial and body animation to Blender data for rendering or simulation.
Canonical URL: https://docs.polyhammer.com/blender-addons/character-dna/0.15.1/free-features/animation
Product: character-dna
Version: 0.15.1
Channel: production
Updated: 2026-11-21T13:45:20Z
Documentation source: initial main snapshot approved 2026-11-21T13:45:20Z
Documentation commit: 3533cd1260a9bd4b2806aaa4c64ead70766a1674
Release tag commit: 71125e9857db2b5a8ffa9426cc1f769d13017fd5
Owner-approved migration baseline: use current main documentation for the current stable release once; all subsequent releases use their tag snapshots.
Import MetaHuman performances onto your character and bake them to plain Blender data for rendering or simulation. The panel has a **Face Board** section and a **Body Animation** section, each with **Import** and **Bake**.
## Face Board Animation [#face-board-animation]
Import facial performance curves — for example from **MetaHuman Animator** — onto the face board.
[Video: metahuman animator face board support](https://docs.polyhammer.com/docs-assets/character-dna/1266b506df4569026b7751ea740d32b5ea2fabb12ae380687e89495ef772c326/images/animation/metahuman_animator_face_board_support.webm)
- **Export from Unreal** — check out [this video](https://youtu.be/j59ftPt7MUY?si=fyU8Z9BMiQ3MqU-X&t=269) on how to do this.
- **Import to Blender** — load a face board animation exported from an Unreal Engine Level Sequence.
- **(Optional) Bake** — write the active face board action down to keyframes on the pose bones, shape key values, and [Texture Logic](/blender-addons/character-dna/0.15.1/terminology#texture-logic) node mask values.
## Body Animation [#body-animation]
Import body performances — from MetaHuman Animator or any re-targeted animation — onto the body rig.
[Video: metahuman animator body support](https://docs.polyhammer.com/docs-assets/character-dna/1266b506df4569026b7751ea740d32b5ea2fabb12ae380687e89495ef772c326/images/animation/metahuman_animator_body_support.webm)
- **Export from Unreal** — check out [this video](https://youtu.be/V4mWGrTJqFg?si=42fupxfBvWyVLK9D&t=265) on how to do this.
- **Import to Blender** — load a body animation onto the character's skeleton.
- **(Optional) Bake** — write the evaluated transforms of the RBF corrective bones down to keyframes.
## Why Bake? [#why-bake]
[Video: bake animation](https://docs.polyhammer.com/docs-assets/character-dna/1266b506df4569026b7751ea740d32b5ea2fabb12ae380687e89495ef772c326/images/animation/bake_animation.webm)
This can be useful for simulations or exporting to other software.
---
# Face Board
Drive the MetaHuman face board with GUI controls and facial poses evaluated by RigLogic.
Canonical URL: https://docs.polyhammer.com/blender-addons/character-dna/0.15.1/free-features/face-board
Product: character-dna
Version: 0.15.1
Channel: production
Updated: 2026-11-21T13:45:20Z
Documentation source: initial main snapshot approved 2026-11-21T13:45:20Z
Documentation commit: 3533cd1260a9bd4b2806aaa4c64ead70766a1674
Release tag commit: 71125e9857db2b5a8ffa9426cc1f769d13017fd5
Owner-approved migration baseline: use current main documentation for the current stable release once; all subsequent releases use their tag snapshots.
The face board is another Blender armature object, but more importantly, its pose bones are the [GUI Controls](/blender-addons/character-dna/0.15.1/terminology#gui-controls) that RigLogic evaluates into a facial expression. This panel drives it with ready-made poses and options for eye and head behavior.
To pose the board by hand, select the face board armature, enter **Pose Mode**, and grab the yellow controls.
[Video: face board poses](https://docs.polyhammer.com/docs-assets/character-dna/1266b506df4569026b7751ea740d32b5ea2fabb12ae380687e89495ef772c326/images/face-board/face_board_poses.webm)
## Pose Library [#pose-library]
Pick a pose from the thumbnail preview or the dropdown to set the face board controls to that expression. Poses cover **visemes, emotions, wrinkle map bases, and scan reference** shapes. These are a fast way to understand what a MetaHuman's rig can do, and what data you need to extract from your scans.
- **Category** filters the list (All, Visemes, Emotions, Wrinkle Maps, Scan Reference).
- The **filter** popover (funnel icon) narrows poses by tag, matching **All** or **Any** of the selected tags.
- The **search** button (magnifier) opens a searchable pose picker.
The wrinkle map poses (`wrinkle_map_01`–`03`) make good base shapes for high-poly sculpts or scans that you later bake down to the texture maps in your material.
## Eye & Head Options [#eye--head-options]
| Option | Effect |
| ------ | ------ |
| Use Eye Aim | Drive the eyes with an aim target instead of the GUI eye controls |
| Eyes Follow Head | Make the eye aim follow head movement |
| Face Board Follow Head | Make the GUI controls follow head movement |
## Importing Animation [#importing-animation]
Importing face board animation from MetaHuman Animator is done under the [Animation](/blender-addons/character-dna/0.15.1/free-features/animation) panel.
---
# Output
Export your changes back to the .dna file format so you can update your MetaHuman in Unreal Engine.
Canonical URL: https://docs.polyhammer.com/blender-addons/character-dna/0.15.1/free-features/output
Product: character-dna
Version: 0.15.1
Channel: production
Updated: 2026-11-21T13:45:20Z
Documentation source: initial main snapshot approved 2026-11-21T13:45:20Z
Documentation commit: 3533cd1260a9bd4b2806aaa4c64ead70766a1674
Release tag commit: 71125e9857db2b5a8ffa9426cc1f769d13017fd5
Owner-approved migration baseline: use current main documentation for the current stable release once; all subsequent releases use their tag snapshots.
Export your changes back to the `.dna` file format so you can update your MetaHuman in Unreal Engine.
[Video: export dna](https://docs.polyhammer.com/docs-assets/character-dna/1266b506df4569026b7751ea740d32b5ea2fabb12ae380687e89495ef772c326/images/output/export_dna.webm)
## Component [#component]
Choose which component to export — **Head** or **Body**. The asset list and options update to match.
## Method [#method]
| Method | When to use |
| ------------------------------ | ---------------------------------------------------------------------------------------------------------------- |
| **Calibrate** *(recommended)* | Your vertex indices and bone names match the original DNA. Calibrates your bone and mesh changes into a new DNA. |
| **Overwrite** *(experimental)* | Your vertex indices or bone names differ from the original DNA. Only use when calibration isn't possible. |
**Overwrite** is new and experimental — it doesn't work in every case yet.
## Asset List [#asset-list]
Lists the meshes, armatures, and images that will be exported. Uncheck any asset to exclude it, and edit the name on the left inline.
Mesh names must follow the MetaHuman **LOD naming convention** so the exporter knows which LOD each mesh belongs to.
## Options [#options]
- **Run Validations** — check the data before writing the DNA.
- **Update LODs** *(Pro)* — recalibrate lower LODs from your LOD0 changes.
- **Align Head and Body** *(Calibrate)* — align overlapping head/body bones to avoid a seam.
## Output Folder [#output-folder]
A single folder where everything is written. The `.dna` components go here, and textures export to a `Maps` subfolder.
If your `.blend` is saved, you can use Blender's relative path syntax to help standardize your export folder. For example, setting `//Ada` will output your `head.dna`, `body.dna`, and `Maps` folder into a folder named `Ada` next to your `.blend` file.
## Export Buttons [#export-buttons]
- **Only Component** — export just the selected component (head or body) to a single DNA file, with no textures or supporting files. Fast when you only need to update one component's DNA.
- **MetaHuman Creator** — export the head and body DNA plus textures in a format MetaHuman Creator accepts. This is the best way to output all the data for your MetaHuman.
---
# Rig Instances
A Rig Instance ties together components (i.e., head and body) which in turn trigger their own RigLogic evaluations per .dna file.
Canonical URL: https://docs.polyhammer.com/blender-addons/character-dna/0.15.1/free-features/rig-instances
Product: character-dna
Version: 0.15.1
Channel: production
Updated: 2026-11-21T13:45:20Z
Documentation source: initial main snapshot approved 2026-11-21T13:45:20Z
Documentation commit: 3533cd1260a9bd4b2806aaa4c64ead70766a1674
Release tag commit: 71125e9857db2b5a8ffa9426cc1f769d13017fd5
Owner-approved migration baseline: use current main documentation for the current stable release once; all subsequent releases use their tag snapshots.
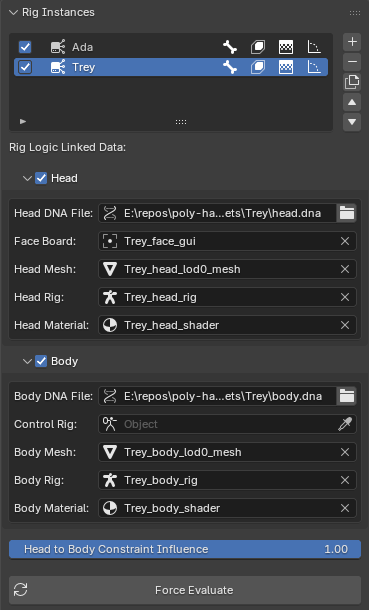
A [Rig Instance](/blender-addons/character-dna/0.15.1/terminology#rig-instance) ties together components (i.e., head and body) which in turn trigger their own RigLogic evaluations per `.dna` file. This panel manages the list of instances in your scene and the data each one links to. The sidebar (and every editor panel in it) is context-sensitive to the **active** instance selected here.
## The Instance List [#the-instance-list]
Each row is one Rig Instance. Per-row toggles control what RigLogic outputs for that instance:
| Toggle | Output |
| ------------- | ------------------------------------------------------------------------------ |
| Auto Evaluate | Master switch — evaluate this instance live |
| Bones | Bone transforms |
| Shape Keys | Shape key values |
| Texture Masks | Wrinkle map masks on the [Texture Logic](/blender-addons/character-dna/0.15.1/terminology#texture-logic) node |
| RBFs | Radial Basis Function corrective poses (body) |
Use the side buttons to **Add**, **Remove**, **Duplicate**, and reorder instances.
Always use **Duplicate** to copy an instance — it re-links all data and constraints. Manually duplicating the objects will leave the new head and body disconnected from their underlying DNA relationships.
## Linked Data [#linked-data]
Expand the **Head** and **Body** sub-panels to assign the objects each RigLogic evaluation reads from. The header checkbox on each enables auto-evaluation for that component.
### Head [#head]
| Field | Purpose |
| ------------- | ---------------------------------------------------------------------------------------- |
| Head DNA File | The `.dna` file RigLogic reads for the head |
| Face Board | The armature RigLogic reads [GUI control](/blender-addons/character-dna/0.15.1/terminology#gui-controls) positions from |
| Head Mesh | The mesh whose shape keys are evaluated |
| Head Rig | The armature whose bones are evaluated |
| Head Material | The material carrying the [Texture Logic](/blender-addons/character-dna/0.15.1/terminology#texture-logic) node |
### Body [#body]
| Field | Purpose |
| ------------- | ------------------------------------------------------------------------------------------------------------------- |
| Body DNA File | The `.dna` file RigLogic reads for the body |
| Control Rig | When this is set, the body rig listens for dependency graph updates from this object, which trigger RigLogic updates|
| Body Mesh | The body mesh |
| Body Rig | The body deform armature |
| Body Material | The body material |
A red/alerted field means required data is missing or a DNA file can't be found on disk. Fields are filled in automatically when you import a DNA file, but you can adjust and re-link data manually. This is important to keep in mind when moving your `.blend` file location, since the `.dna` files are a dependency for the rigs. You can use Blender's relative path syntax to help with this. For example, `//head.dna`, `//body.dna`, etc.
## Head to Body Constraint Influence [#head-to-body-constraint-influence]
When a head and body are imported together, the head is constrained to follow the body's bones. This slider controls how strongly the head follows the body. Setting it to zero detaches it completely from the body.
## Force Evaluate [#force-evaluate]
Forces evaluation for the active [Rig Instance](/blender-addons/character-dna/0.15.1/terminology#rig-instance) and resets its cache. This is the catch-all for refreshing your RigLogic connections and references in case something changed or data is stale.
---
# View Options
Control viewport visibility for the active Rig Instance without changing DNA or exported data.
Canonical URL: https://docs.polyhammer.com/blender-addons/character-dna/0.15.1/free-features/view-options
Product: character-dna
Version: 0.15.1
Channel: production
Updated: 2026-11-21T13:45:20Z
Documentation source: initial main snapshot approved 2026-11-21T13:45:20Z
Documentation commit: 3533cd1260a9bd4b2806aaa4c64ead70766a1674
Release tag commit: 71125e9857db2b5a8ffa9426cc1f769d13017fd5
Owner-approved migration baseline: use current main documentation for the current stable release once; all subsequent releases use their tag snapshots.
Controls what's visible in the viewport for the active [Rig Instance](/blender-addons/character-dna/0.15.1/terminology#rig-instance). These settings are display-only. They don't change your DNA or exported data and are purely there to help you navigate the viewport.
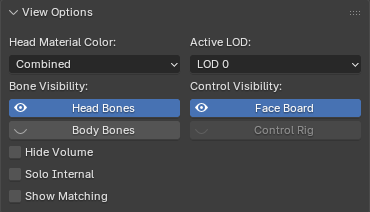
## Head Material Color [#head-material-color]
Preview which map the head material shows:
- **Combined** — the final shaded result
- **Masks** — the wrinkle map masks
- **Normals** — the normal maps
This can be useful when debugging your wrinkle maps.
## Active LOD [#active-lod]
Switch the visible head mesh between its Levels of Detail (**LOD0–LOD7**) and the body mesh between its Levels of Detail (**LOD0–LOD3**).
## Bone Visibility [#bone-visibility]
| Toggle | Effect |
| ------ | ------ |
| Head Bones | Show/hide the head rig's bones |
| Body Bones | Show/hide the body rig's bones |
| Hide Volume | Hide the non-skinned volume/leaf bones to reduce clutter |
| Solo Internal | Hide surface bones to inspect the internal skeleton only |
| Show Matching | Highlight bones that match the active bone (helpful when trying to identify the same bone in another Rig Instance) |
## Control Visibility [#control-visibility]
| Toggle | Effect |
| ------ | ------ |
| Face Board | Show/hide the face board control rig |
| Control Rig | Show/hide the body control rig |
---
# Character DNA Addon
Import MetaHuman DNA into Blender, evaluate face rigs with OpenRigLogic, and export your changes to Unreal Engine.
Canonical URL: https://docs.polyhammer.com/blender-addons/character-dna/0.15.1
Product: character-dna
Version: 0.15.1
Channel: production
Updated: 2026-11-21T13:45:20Z
Documentation source: initial main snapshot approved 2026-11-21T13:45:20Z
Documentation commit: 3533cd1260a9bd4b2806aaa4c64ead70766a1674
Release tag commit: 71125e9857db2b5a8ffa9426cc1f769d13017fd5
Owner-approved migration baseline: use current main documentation for the current stable release once; all subsequent releases use their tag snapshots.
Bring MetaHuman characters into Blender and evaluate their face rigs in real time, exactly like Unreal Engine. The addon reads Epic Games' `.dna` files and drives them using the [OpenRigLogic](https://github.com/EpicGames/OpenRigLogic) runtime.
[Video: riglogic merged compare](https://docs.polyhammer.com/docs-assets/character-dna/1266b506df4569026b7751ea740d32b5ea2fabb12ae380687e89495ef772c326/images/getting-started/riglogic_merged_compare.webm)
The addon comes in two editions:
- **Free** — Import, animate, bake data, and export your scene data to your MetaHuman's DNA.
- **Pro** — Everything in Free, plus advanced editors for users who need full control over the data structures that define DNA behavior.
Because of this, the documentation has been organized by Free or Pro features.
## Install the Addon [#install-the-addon]
Create an account on the [Poly Hammer Portal](https://dashboard.portal.polyhammer.com/signup), then link the extensions server by following these [instructions](/portal/blender-extension-repo).
Once installed, a `Character DNA` tab appears on the right side of the 3D Viewport (toggle with the `N` key). Most panels start hidden and become visible once a [Rig Instance](/blender-addons/character-dna/0.15.1/terminology#rig-instance) exists in the scene.
## Import Your DNA [#import-your-dna]
The fastest way to start is to drag and drop a `head.dna` file into the Blender viewport. You can also do this via `File > Import > MetaHuman DNA (.dna)` from Blender's header menu.
[Video: metahuman creator support](https://docs.polyhammer.com/docs-assets/character-dna/1266b506df4569026b7751ea740d32b5ea2fabb12ae380687e89495ef772c326/images/getting-started/metahuman_creator_support.webm)
If a `Maps` folder sits alongside the `.dna` file, the importer automatically links matching textures.
`.dna` files are a proprietary format from Epic Games and are core to the MetaHuman identity — they encode the complete shape and rig of a MetaHuman. You can obtain them by exporting them from [MetaHuman Creator](https://dev.epicgames.com/documentation/metahuman/metahuman-creator-export-tool-in-unreal-engine#dccexport) via its DCC export.
## Next Steps [#next-steps]
You now have a MetaHuman evaluating in real time in Blender.
- New to MetaHuman terms? Read the [Terminology](/blender-addons/character-dna/0.15.1/terminology) overview.
- Ready to learn the addon's features? Explore the [Free Features](/blender-addons/character-dna/0.15.1/free-features/rig-instances) and [Pro Features](/blender-addons/character-dna/0.15.1/pro-features/converter).
- Hitting a snag? Check the [FAQ](/blender-addons/character-dna/0.15.1/faq).
---
# Backup Manager
The Backup Manager is part of the Pro edition and only appears when Pro is installed.
Canonical URL: https://docs.polyhammer.com/blender-addons/character-dna/0.15.1/pro-features/backup-manager
Product: character-dna
Version: 0.15.1
Channel: production
Updated: 2026-11-21T13:45:20Z
Documentation source: initial main snapshot approved 2026-11-21T13:45:20Z
Documentation commit: 3533cd1260a9bd4b2806aaa4c64ead70766a1674
Release tag commit: 71125e9857db2b5a8ffa9426cc1f769d13017fd5
Owner-approved migration baseline: use current main documentation for the current stable release once; all subsequent releases use their tag snapshots.
The Backup Manager is part of the **Pro** edition and only appears when Pro is installed.
Automatically snapshots your `.dna` before and after changes are committed, giving you a fast way to roll back to a previous state.
[Video: backup manager](https://docs.polyhammer.com/docs-assets/character-dna/1266b506df4569026b7751ea740d32b5ea2fabb12ae380687e89495ef772c326/images/backup-manager/backup_manager.webm)
## Backup Events [#backup-events]
A backup is taken automatically around every point where your DNA could change, plus whenever you save your `.blend` file:
| Event | Fires |
| ----- | ----- |
| Blender File Saved | Every time you save the `.blend` file |
| Pre Raw Editor Commit | Right before committing an edit from the [Raw Editor](/blender-addons/character-dna/0.15.1/pro-features/raw-editor) |
| Post Raw Editor Commit | Right after committing an edit from the [Raw Editor](/blender-addons/character-dna/0.15.1/pro-features/raw-editor) |
| Pre Raw Editor (Rest Pose) Commit | Right before committing a Rest Pose (bind pose) edit from the [Raw Editor](/blender-addons/character-dna/0.15.1/pro-features/raw-editor) |
| Post Raw Editor (Rest Pose) Commit | Right after committing a Rest Pose (bind pose) edit from the [Raw Editor](/blender-addons/character-dna/0.15.1/pro-features/raw-editor) |
| Pre RBF Editor Commit | Right before committing an edit from the [RBF Editor](/blender-addons/character-dna/0.15.1/pro-features/rbf-editor) |
| Post RBF Editor Commit | Right after committing an edit from the [RBF Editor](/blender-addons/character-dna/0.15.1/pro-features/rbf-editor) |
| Pre Shape Key Editor Commit | Right before committing an edit from the [Shape Key Editor](/blender-addons/character-dna/0.15.1/pro-features/shape-key-editor) |
| Post Shape Key Editor Commit | Right after committing an edit from the [Shape Key Editor](/blender-addons/character-dna/0.15.1/pro-features/shape-key-editor) |
| Manual Backup | Whenever you click **Add** in the Backup Manager panel |
Taking both a "pre" and "post" snapshot around each editor commit means you can always roll back to either side of a change — the state right before you committed, or the freshly committed result.
Automatic backups can be turned off entirely from the addon preferences (see [Preferences](#preferences) below). Manual backups are always available regardless of that setting.
## The Backup List [#the-backup-list]
Each entry is a timestamped snapshot with a description and type (for example, taken before or after a commit). Use the side buttons to:
- **Refresh** — rescan the backups folder.
- **Folder** — open the backups folder in your file explorer.
- **Add** — create a manual backup right now.
## Restoring [#restoring]
Select a backup and click **Restore**. Choose what to bring back:
| Option | Restores |
| ------ | -------- |
| Reimport Meshes | Mesh geometry |
| Reimport Bones | Bone/rig data |
| Reimport Shape Keys | Shape keys |
**Delete** removes the selected backup.
It's good practice to create manual backups with clear descriptions as you make changes to your DNA files.
## Preferences [#preferences]
Backup behavior is configured in the addon's preferences:
| Setting | Purpose |
| ------- | ------- |
| Enable Auto DNA Backups | Master switch for the automatic backups listed above. Turning this off stops new automatic backups from being created — manual backups are unaffected. |
| DNA Backup Folder | Where backups are stored. Defaults to a folder in your system's temp directory. You can point this at any absolute path, or use Blender's `//` relative-path syntax (e.g. `//backups`) to store backups in a folder next to the current saved `.blend` file. |
| Maximum Backups to Keep | The retention policy — the number of **automatic** backups to keep per Rig Instance before the oldest are deleted. Manually created backups are never deleted automatically, regardless of this setting. |
---
# Converter
The Converter is part of the Pro edition and only appears when Pro is installed.
Canonical URL: https://docs.polyhammer.com/blender-addons/character-dna/0.15.1/pro-features/converter
Product: character-dna
Version: 0.15.1
Channel: production
Updated: 2026-11-21T13:45:20Z
Documentation source: initial main snapshot approved 2026-11-21T13:45:20Z
Documentation commit: 3533cd1260a9bd4b2806aaa4c64ead70766a1674
Release tag commit: 71125e9857db2b5a8ffa9426cc1f769d13017fd5
Owner-approved migration baseline: use current main documentation for the current stable release once; all subsequent releases use their tag snapshots.
The Converter is part of the **Pro** edition and only appears when Pro is installed.
Re-fit a base MetaHuman DNA onto your own head and body meshes, producing a new `.dna` calibrated to your geometry.
[Video: auto fitting algorithm](https://docs.polyhammer.com/docs-assets/character-dna/1266b506df4569026b7751ea740d32b5ea2fabb12ae380687e89495ef772c326/images/converter/auto_fitting_algorithm.webm)
This uses the UV layout of your wrapped mesh to relocate the DNA's bones and shapes to match.
## Basic Setup [#basic-setup]
| Field | Purpose |
| ----- | ------- |
| Base DNA | The source `.dna` to convert from |
| Name | Filename for the new DNA |
| Output | Folder the new DNA is written to |
| Head | Your head mesh to fit |
| Body | Your body mesh to fit |
Auto-fitting is **UV based**. Your mesh must share the base MetaHuman UV layout with no overlapping or extra islands, or the fit won't be correct. See [Mesh Wrapping](/blender-addons/character-dna/0.15.1/workflows/mesh-wrapping) for how to produce a compatible mesh.
## Advanced [#advanced]
Expand **Advanced** for finer control:
- **Reference Meshes** — Base-DNA meshes (eyes, teeth, etc.) to fit during conversion. Each can use a **Wrap** or **Relative** fit method.
- **Constrain Head to Body** — align overlapping head/body bones so the two components meet cleanly (avoids a seam).
- **Zero Shape Deltas** — reset shape key deltas during conversion.
- **Validate UVs** / **Tolerance** — check UV consistency within a tolerance before fitting.
**Normalize to A-Pose** selects the regions whose posture is corrected during conversion:
| Mode | Behavior |
| ---- | -------- |
| Off | Retain the input posture. |
| Limbs Only (default) | Normalize clavicles, arms, hands, fingers, legs, feet, and toes. |
| Spine Only | Normalize the spine, neck, and head alignment. Limbs follow their attachments while retaining local articulation. |
| All | Normalize the limbs and spine together. |
## LOD Calibration [#lod-calibration]
The Converter calibrates lower LODs from your LOD0 mesh automatically when the DNA conversion happens. This keeps all levels in sync with that initial `Convert to DNA` operation.
[Video: lod calibration](https://docs.polyhammer.com/docs-assets/character-dna/1266b506df4569026b7751ea740d32b5ea2fabb12ae380687e89495ef772c326/images/converter/lod_calibration.webm)
## Convert to DNA [#convert-to-dna]
Runs the conversion and writes the new `.dna` files in a similar fashion to the **MetaHuman Creator** DCC export process.
---
# Raw Editor
The Raw Editor is part of the Pro edition and only appears when Pro is installed.
Canonical URL: https://docs.polyhammer.com/blender-addons/character-dna/0.15.1/pro-features/raw-editor
Product: character-dna
Version: 0.15.1
Channel: production
Updated: 2026-11-21T13:45:20Z
Documentation source: initial main snapshot approved 2026-11-21T13:45:20Z
Documentation commit: 3533cd1260a9bd4b2806aaa4c64ead70766a1674
Release tag commit: 71125e9857db2b5a8ffa9426cc1f769d13017fd5
Owner-approved migration baseline: use current main documentation for the current stable release once; all subsequent releases use their tag snapshots.
The Raw Editor is part of the **Pro** edition and only appears when Pro is installed.
Edit the [Raw Controls](/blender-addons/character-dna/0.15.1/terminology#raw-controls) — more specifically **where** bones are posed when a [Raw Control](/blender-addons/character-dna/0.15.1/terminology#raw-controls) is activated to a value of 1.
Choose **Head** or **Body** with the shared **Component** selector. The selector is locked during editing, and Commit writes to that component's DNA.
[Video: raw editor](https://docs.polyhammer.com/docs-assets/character-dna/1266b506df4569026b7751ea740d32b5ea2fabb12ae380687e89495ef772c326/images/raw-editor/raw_editor.webm)
## Choosing a Raw Control [#choosing-a-raw-control]
The list shows scalar raw controls, plus a **Rest Pose** row at the top called `default` for editing the neutral shape. Quaternion driver inputs are handled by the RBF Editor. Filter the list by:
- **Mesh** — scope controls to a specific LOD0 mesh.
- **Name** — search a control by name.
- **Non-Zero** — hide-zero-value controls. (This can be useful to find which controls are activated.)
- **Value Sort** — sort by value so you can see which controls have the highest values.
- **Side** — a side filter (Left / Right / Center). Helpful if you only want to work on one side of the face.
- **Freeze** — the snowflake button locks the current list order and filtering in place so rows do not reshuffle while you scrub the raw control values.
Select a control and click **Edit** to open an editing session for that expression's pose.
Some raw controls like `jawOpenExtreme` are "corrective" expressions, so they activate the expressions they add onto (for example, `jawOpen`).
## Editing a Pose [#editing-a-pose]
While editing, you have two options: work on **target meshes** (LOD0 sculpt targets) or re-pose the selected component's **pose bones** directly. The available tools depend on the mode you're in:
**Editing the Target Mesh** — Mirror, Flip, Reset to Neutral, Reset to DNA, Transfer shape from a selected mesh, and (Rest Pose only) Transfer to Head. A **Strength** slider blends the operation result.
**Editing the Pose Bones Directly** — Mirror/Flip bones, Reset to Rest Pose, Reset to DNA, Mirror/Flip selection, and (Rest Pose only) Snap Bones to Surface.
When done, **Commit** writes the change into the DNA, or **Revert** discards it. Options let you mirror on commit and, for Rest Pose edits, update the mesh and auto-update LODs.
## Bone Matching Solver [#bone-matching-solver]
Instead of posing bones by hand, let the solver find the bone transforms that best fit a target mesh sculpt.
[Video: bone matching solver](https://docs.polyhammer.com/docs-assets/character-dna/1266b506df4569026b7751ea740d32b5ea2fabb12ae380687e89495ef772c326/images/raw-editor/bone_matching_solver.webm)
Sculpt your target mesh, then click **Match Bones to Mesh**. It runs a hyper-optimization algorithm to solve the bone transforms that reproduce your sculpt. The **Solver Settings** popover exposes the hyperparameters:
| Setting | Purpose |
| ------- | ------- |
| Iterations | Number of optimization steps |
| Learning Rate | Optimization step size |
| Rotation / Translation Reg | Regularization to keep the solve stable |
| Warm Weight Threshold | Threshold for warm-start weighting |
| Huber Delta (cm) | Robustness of the loss to outliers |
| Convergence Tolerance | When to stop early |
Enable **Reset Pose** to start each solve from the DNA pose, or disable this to start the solve from the current pose bone positions in the Blender scene.
Start with the defaults. If the fit undershoots, raise iterations or learning rate; if it gets unstable or spiky, raise the regularization.
## Setup and Hardware [#setup-and-hardware]
The bone matching process happens in another Python subprocess that utilizes [PyTorch](https://pytorch.org/) for accelerating compute on your hardware. This includes options for `CPU`, `CUDA`, and `MPS` on macOS. Setting this to `AUTO` will try to install the dependencies for the most optimal hardware that you have available.
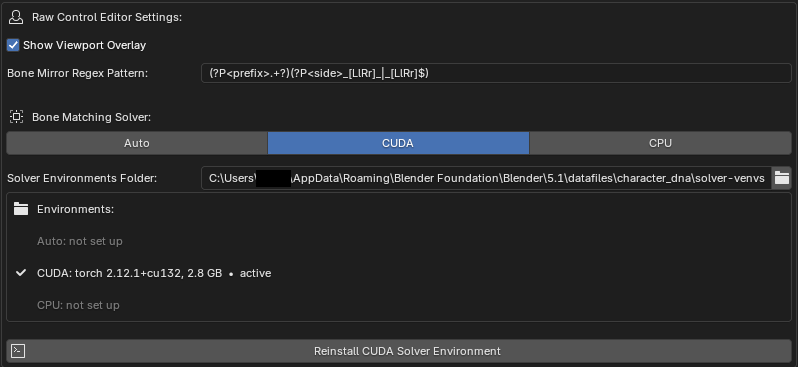
You will have to run the installation process once before you can use the `Match Bones to Mesh` operator. If you have a preference for where the virtual environments should be on disk (these can be several GB), you can set that in the **Solver Environments Folder** preference.
---
# RBF Editor
The RBF Editor is part of the Pro edition and only appears when Pro is installed.
Canonical URL: https://docs.polyhammer.com/blender-addons/character-dna/0.15.1/pro-features/rbf-editor
Product: character-dna
Version: 0.15.1
Channel: production
Updated: 2026-11-21T13:45:20Z
Documentation source: initial main snapshot approved 2026-11-21T13:45:20Z
Documentation commit: 3533cd1260a9bd4b2806aaa4c64ead70766a1674
Release tag commit: 71125e9857db2b5a8ffa9426cc1f769d13017fd5
Owner-approved migration baseline: use current main documentation for the current stable release once; all subsequent releases use their tag snapshots.
The RBF Editor is part of the **Pro** edition and only appears when Pro is installed.
Modify, add, and delete corrective bone poses on the selected **Head** or **Body** component. These correctives interpolate between one another using **Radial Basis Functions (RBF)**. As the driver bones move, the corresponding corrective outputs blend according to the solver's falloff function.
The **Component** selector is shared with the Raw and Shape Key editors and is locked during editing. Head DNA can contain RBF solvers too. The Driven list also displays existing shape and animated-map relationships; shape geometry is edited in the Shape Key Editor.
[Video: rbf editor](https://docs.polyhammer.com/docs-assets/character-dna/1266b506df4569026b7751ea740d32b5ea2fabb12ae380687e89495ef772c326/images/rbf-editor/rbf_editor.webm)
## Solvers & Poses [#solvers--poses]
- The **Solvers** list holds the RBF solvers in the selected component's DNA. A solver can use multiple drivers and joint groups.
- The **Poses** list holds the `driven` corrective bone poses for the active solver. You can have as many or as few poses as needed to make your solver interpolate to all the corrective positions.
Click **Edit** to modify a solver. While editing, you can **Add**, **Remove**, and **Mirror** solvers (mirroring maps the driving bones left ↔ right).
## Settings [#settings]
Expand **Settings** while editing to choose the **Function Type**, the RBF kernel (e.g. Gaussian, Linear), with a live curve preview showing how the interpolation falls off.
## Committing [#committing]
**Commit** writes your changes into the selected component's DNA; **Revert** discards them.
While in RBF editing mode, you must click **Apply Pose Transform Edits** before switching to another pose. This is how you associate the changes with a pose. Please note these are still ephemeral until committed to the DNA.
---
# Shape Key Editor
The Shape Key Editor is part of the Pro edition and only appears when Pro is installed.
Canonical URL: https://docs.polyhammer.com/blender-addons/character-dna/0.15.1/pro-features/shape-key-editor
Product: character-dna
Version: 0.15.1
Channel: production
Updated: 2026-11-21T13:45:20Z
Documentation source: initial main snapshot approved 2026-11-21T13:45:20Z
Documentation commit: 3533cd1260a9bd4b2806aaa4c64ead70766a1674
Release tag commit: 71125e9857db2b5a8ffa9426cc1f769d13017fd5
Owner-approved migration baseline: use current main documentation for the current stable release once; all subsequent releases use their tag snapshots.
The Shape Key Editor is part of the **Pro** edition and only appears when Pro is installed.
Edit the blend shapes (shape keys) a DNA drives. With this editor, you will sculpt directly onto the activated shape key while locking all others.
A basic shape key like `jaw_open` sits on top of a single `jawOpen` Raw Control value and its posed bones. Other shape keys like `MCornerDepress_NSwrinkle_Jopen_R` are only visible as correctives that activate in the face when other raw controls or shape keys are active as well.
Thus, entering editing mode activates the dependents backward from the desired shape key you want to edit.
[Video: shape key editor](https://docs.polyhammer.com/docs-assets/character-dna/1266b506df4569026b7751ea740d32b5ea2fabb12ae380687e89495ef772c326/images/shape-key-editor/shape_key_editor.webm)
## Importing Shape Keys [#importing-shape-keys]
Choose **Head** or **Body** with the shared **Component** selector. Import and editing use that component's DNA. The selector is locked during an import or edit session. A component with no blend-shape targets has no shape keys to import.
If you just imported your MetaHuman, then you need to run the **Import Shape Keys** operator to actually load them from the DNA into the Blender scene. Enable **Generate Neutral** to auto-generate neutral shapes during import if you want to work with a clean slate.
## Choosing a Shape Key [#choosing-a-shape-key]
The list shows every shape key channel. Filter by:
- **Mesh** — scope shape keys to a specific LOD0 mesh.
- **Name** — search a shape key by name.
- **Non-Zero** — hide-zero-value shape keys. (This can be useful to find which shape keys are activated.)
- **Value Sort** — sort by value so you can see which shape keys have the highest values.
- **Side** — a side filter (Left / Right / Center). Helpful if you only want to work on one side of the face.
- **Deltas** — the ghost button is a filter to hide shape keys that do not actually contain vertex changes (a sculpted offset different from the basis). This so you can quickly spot which shape keys hold edits. This is handy when sculpting a custom character where most shape keys have been zeroed out from the beginning.
- **Freeze** — the snowflake button locks the current list order and filtering in place so rows do not reshuffle while you scrub shape key values.
## Editing with Dependencies [#editing-with-dependencies]
Select a channel and click **Edit**. Because expressions combine through [PSDs](/blender-addons/character-dna/0.15.1/terminology#how-an-expression-is-evaluated), a shape key often depends on other shapes and raw controls. The editor shows a **dependency list** so you can see exactly what contributes to the shape you're editing:
- The dependencies are **locked** (read-only context).
- The edited key is **unlocked**.
- Toggle each dependency's visibility to diff what you're sculpting vs what is below it.
You can make changes in **Sculpt** or **Edit** mode, using Mirror / Flip / Reset as needed, then **Commit** to write the change into the DNA or **Revert** to discard it.
---
# Swing and Twist Editor
The Swing and Twist Editor adjusts the behavior of swing and twist bones in a component's DNA.
Canonical URL: https://docs.polyhammer.com/blender-addons/character-dna/0.15.1/pro-features/swing-twist-editor
Product: character-dna
Version: 0.15.1
Channel: production
Updated: 2026-11-21T13:45:20Z
Documentation source: initial main snapshot approved 2026-11-21T13:45:20Z
Documentation commit: 3533cd1260a9bd4b2806aaa4c64ead70766a1674
Release tag commit: 71125e9857db2b5a8ffa9426cc1f769d13017fd5
Owner-approved migration baseline: use current main documentation for the current stable release once; all subsequent releases use their tag snapshots.
The Swing and Twist Editor adjusts the behavior of swing and twist bones in a component's DNA.
Blend values range from 0 to 1 and are independent: they do not need to add up to 1. A valid setup may contain weights such as `0.5, 0.0`.
The displayed bone rotations include local compensation, so a blend value is not an absolute world-space rotation percentage.
**Axis** is expressed in the driver's local Blender coordinate system. When swing and twist share their quaternion inputs,
changing the axis keeps the matching setup's axis in sync to match OpenRigLogic's evaluation. Its blend weights stay unchanged.
Conflicting or unsupported existing setups are
shown with an explanation and are not silently repaired.
Each affected bone also has selection and reset buttons beside its blend value. Resetting a blend restores only that
value to the start of the session; resetting the driver preview returns its rotation offset to **0°**.
Only blend weights and the decomposition axis are authored. **Preview Rotation** is a preview tool:
changing it alone does not change the DNA on Commit, and both Commit and Revert restore the original driver pose.
---
# Terminology
Understand Rig Instances, components, DNA, RigLogic, and the terms used throughout Character DNA documentation.
Canonical URL: https://docs.polyhammer.com/blender-addons/character-dna/0.15.1/terminology
Product: character-dna
Version: 0.15.1
Channel: production
Updated: 2026-11-21T13:45:20Z
Documentation source: initial main snapshot approved 2026-11-21T13:45:20Z
Documentation commit: 3533cd1260a9bd4b2806aaa4c64ead70766a1674
Release tag commit: 71125e9857db2b5a8ffa9426cc1f769d13017fd5
Owner-approved migration baseline: use current main documentation for the current stable release once; all subsequent releases use their tag snapshots.
We use MetaHuman-specific lingo throughout these docs. This page defines the core concepts you need to know to use our addon. However, please always consult the official [MetaHuman Documentation](https://dev.epicgames.com/documentation/metahuman/metahuman-documentation) by Epic Games.
## DNA [#dna]
MetaHuman DNA is a proprietary file format from Epic Games that stores the **complete description of a character's rig and geometry** — meshes, joints, blend shapes, skin weights, texture masks, and the RigLogic rules that tie them together. RigLogic reads a `.dna` file to evaluate a face or body.
## Rig Logic [#rig-logic]
The runtime that powers MetaHuman face rigs. [OpenRigLogic](https://github.com/EpicGames/OpenRigLogic) is open-sourced by Epic Games and is what this addon uses as the **evaluation module**, so results match Unreal Engine 1-to-1. Epic's [white paper](https://cdn2.unrealengine.com/rig-logic-whitepaper-v2-5c9f23f7e210.pdf) gives a deep dive into the design of RigLogic.
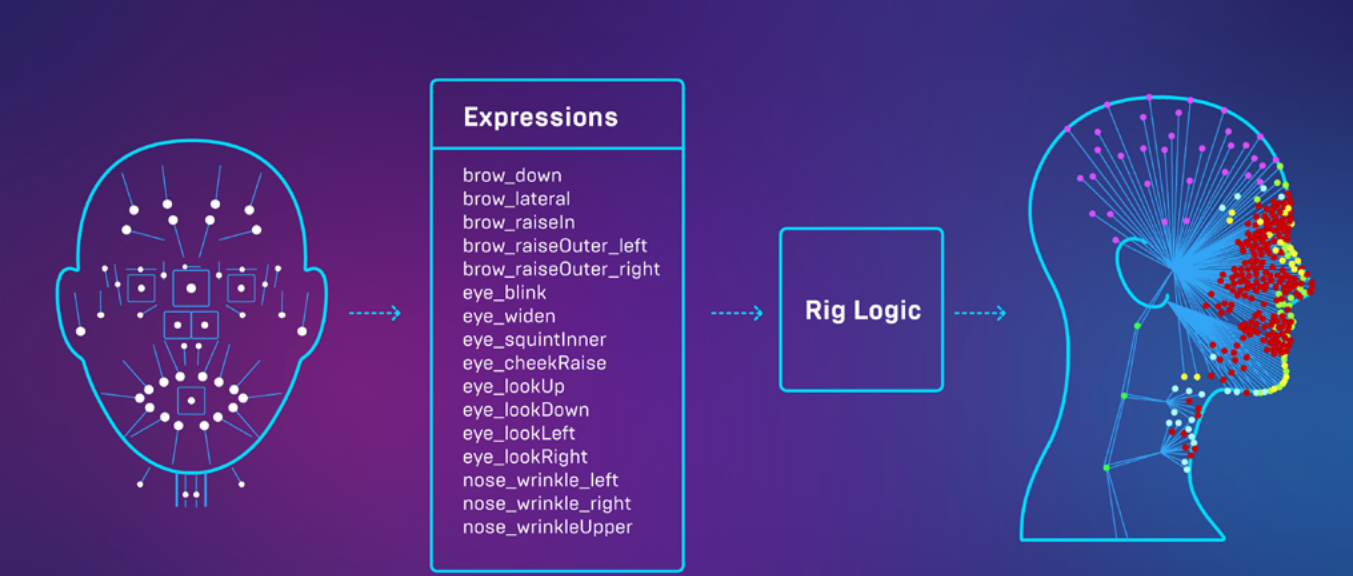
The key idea: RigLogic converts a small set of high-level **inputs** into a large set of low-level **outputs**. One input layer drives many output layers.
**Inputs (face board GUI controls).** These GUI controls map to [Raw Control](https://dev.epicgames.com/documentation/metahuman/mh-standards-docs/mha_index) values when you pose the face board.
**Outputs (driven by the inputs):**
* **Bone Transforms** — RigLogic calls these *joints*; Blender calls them *bones*.
* **Shape Key Values** — RigLogic calls these *blend shapes*; Blender calls them *shape keys*.
* **Wrinkle Map Masks** — driven through the addon's [Texture Logic](#texture-logic) node.
Toggle each of these outputs on your [Rig Instance](#rig-instance) to see its individual contribution while an animation plays or when you move a control.
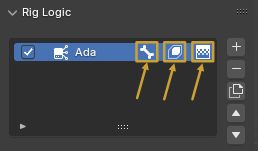
### How an expression is evaluated [#how-an-expression-is-evaluated]
Under the hood, RigLogic runs each pose through a few stages. You don't need to know the math to use the addon, but understanding the vocabulary helps:
* **PSDs (Pose Space Deformations)** — are expressions that represent complex poses and how they are corrected. They define how multiple different expressions should be combined together. This is why editing one shape can affect the final result of others (see the [Shape Key Editor](/blender-addons/character-dna/0.15.1/pro-features/shape-key-editor)).
### LODs [#lods]
A DNA stores multiple [Levels of Detail](https://en.wikipedia.org/wiki/Level_of_detail_(computer_graphics)) (LOD0–LOD7). LOD0 is the source of truth as far as the Blender addon is concerned. The addon calibrates lower LODs from your LOD0 edits.
*Update LODs* is a Pro feature.
## Rig Instance [#rig-instance]
A Rig Instance is the data block the addon uses to tie together which scene data belongs to which RigLogic evaluation. You can have **multiple Rig Instances** in one scene, each reading from its own DNA file, and a single Rig Instance can hold more than one RigLogic evaluation (a head and a body, for example).
The `Character DNA` sidebar is **context-sensitive to the active Rig Instance** selected in the [Rig Instances](/blender-addons/character-dna/0.15.1/free-features/rig-instances) panel — only the active instance's properties are shown and modified.
## Texture Logic [#texture-logic]
A special material node that blends 3 color-map and 3 normal-map variants based on the current RigLogic evaluation, producing animated wrinkle maps. The masks decide where each variant shows through:
**Black** — Base Map
**Red** — Wrinkle Map 1
**Green** — Wrinkle Map 2
**Blue** — Wrinkle Map 3
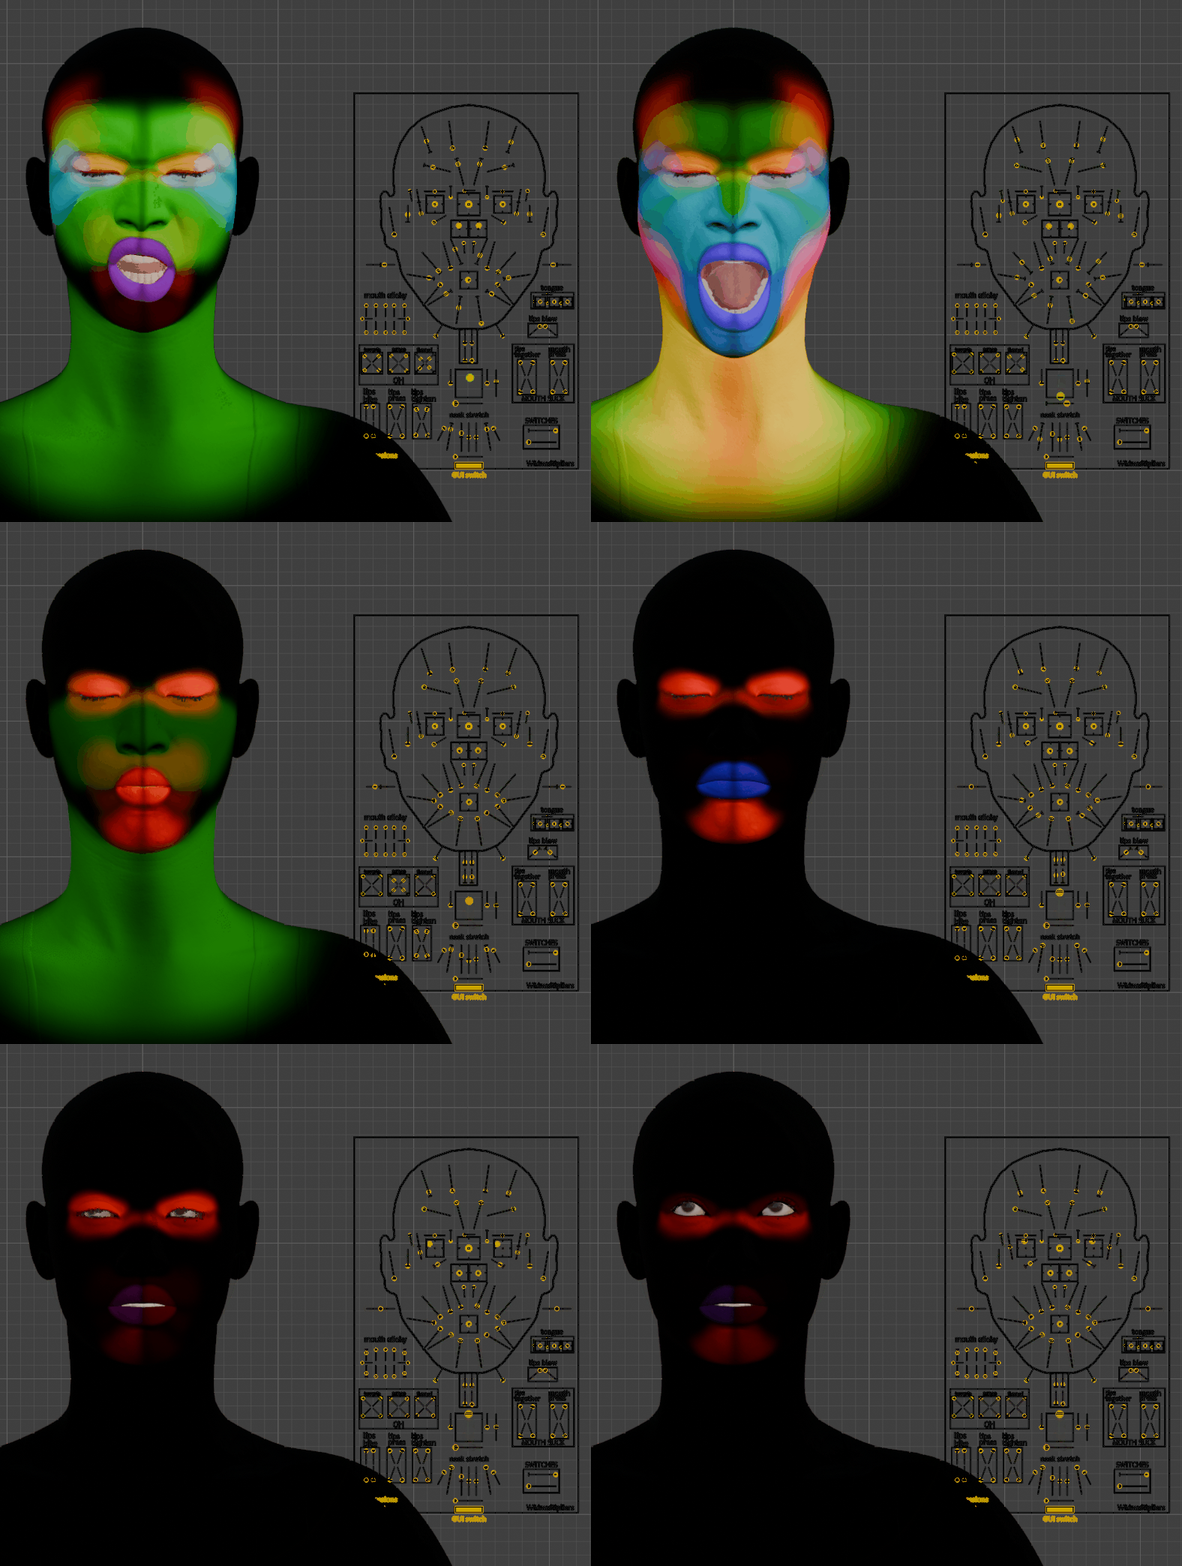
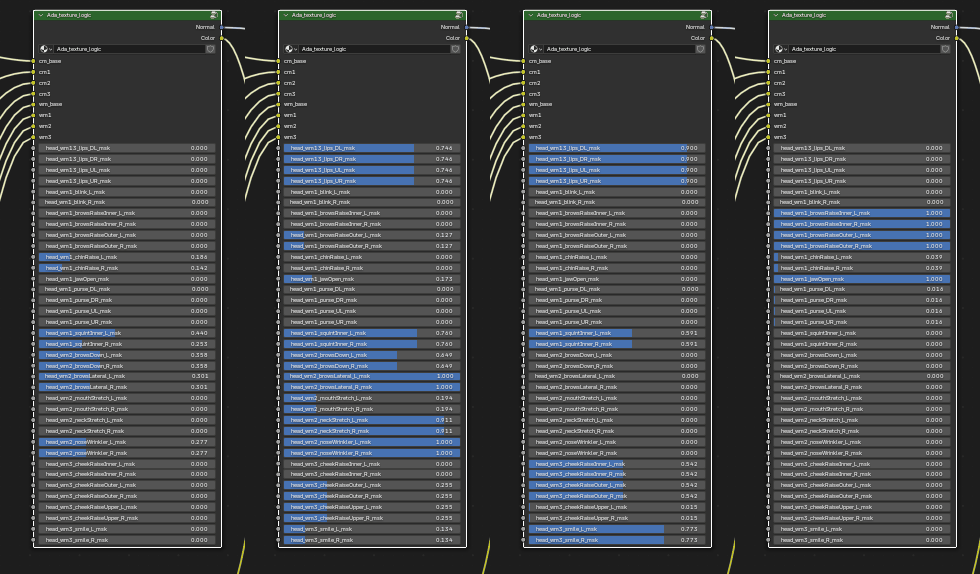
See [Customizing Materials](/blender-addons/character-dna/0.15.1/workflows/customizing-materials) for setup and naming conventions.
## GUI Controls [#gui-controls]
The yellow pose bones on the face board object. These are the high-level **inputs** to RigLogic.
## Raw Controls [#raw-controls]
These are ultimately the true **inputs** to RigLogic but are conventionally driven by GUI Controls via a mapping defined in the DNA. All these **outputs** below are calculated based on the Raw Control values:
* Pose Bone Transforms
* Shape Keys
* Wrinkle Map Masks
* PSD Correctives (Which affect the combinations of the 3 things above)
---
# Append & Link
On a production, you'll often set up an asset in one .blend file and then bring it into another .blend file.
Canonical URL: https://docs.polyhammer.com/blender-addons/character-dna/0.15.1/workflows/append-link
Product: character-dna
Version: 0.15.1
Channel: production
Updated: 2026-11-21T13:45:20Z
Documentation source: initial main snapshot approved 2026-11-21T13:45:20Z
Documentation commit: 3533cd1260a9bd4b2806aaa4c64ead70766a1674
Release tag commit: 71125e9857db2b5a8ffa9426cc1f769d13017fd5
Owner-approved migration baseline: use current main documentation for the current stable release once; all subsequent releases use their tag snapshots.
On a production, you'll often set up an asset in one `.blend` file and then bring it into another `.blend` file. For MetaHumans, you need to use the **Append** or **Link** operation to do this correctly since there is more than just Blender data involved, and the DNA file relationships need to be reconfigured.
## How To [#how-to]
Open **File → Import → MetaHuman Append/Link (.blend)** and select a `.blend` file instead of a `.dna`. You'll see a list of MetaHumans available in that file. Pick one and choose the operation:
- **Append** — copy the MetaHuman into the current file (independent copy).
- **Link** — reference the MetaHuman from the source file (updates propagate).
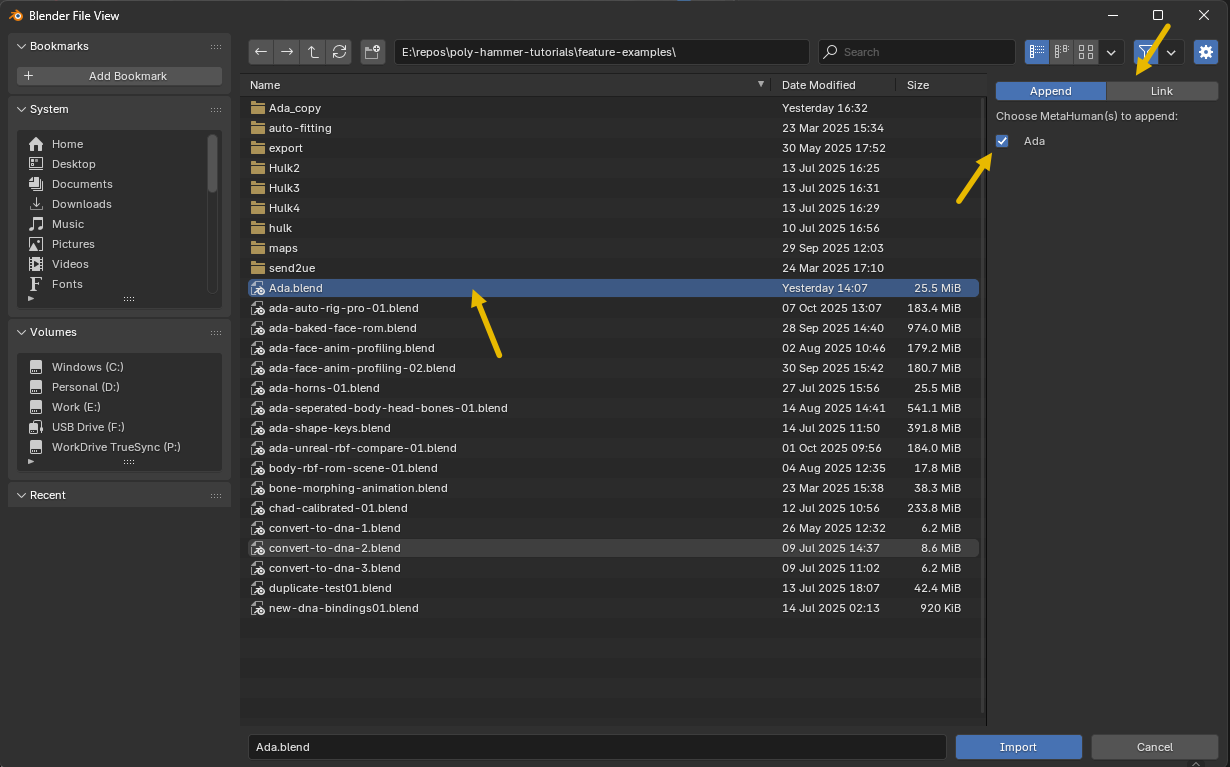
When linking, there is an option `Editable Rig` that can be turned on. This make's the linked MetaHuman's face board and control rig native to the blender scene, thus allowing you to pose and animated with the rigs while not being able to edit the other data on the MetaHuman objects.
## Keep the Collection Names Intact [#keep-the-collection-names-intact]
Append/Link only works when the MetaHuman keeps the **collection names** the importer created. Renaming or re-nesting those collections breaks this operator's ability to append or link all data correctly.
If you need to organize your outliner, do it **without renaming** the MetaHuman's generated collections or moving its rigs out of them. You can change a MetaHuman's name directly on its entry in the [Rig Instances](/blender-addons/character-dna/0.15.1/free-features/rig-instances) panel.
---
# Customizing Materials
Textures feed the Texture Logic node, which blends color and normal map variants to produce animated wrinkle maps as RigLogic evaluates.
Canonical URL: https://docs.polyhammer.com/blender-addons/character-dna/0.15.1/workflows/customizing-materials
Product: character-dna
Version: 0.15.1
Channel: production
Updated: 2026-11-21T13:45:20Z
Documentation source: initial main snapshot approved 2026-11-21T13:45:20Z
Documentation commit: 3533cd1260a9bd4b2806aaa4c64ead70766a1674
Release tag commit: 71125e9857db2b5a8ffa9426cc1f769d13017fd5
Owner-approved migration baseline: use current main documentation for the current stable release once; all subsequent releases use their tag snapshots.
Textures feed the [Texture Logic](/blender-addons/character-dna/0.15.1/terminology#texture-logic) node, which blends color and normal map variants to produce animated wrinkle maps as RigLogic evaluates.


## Custom Materials [#custom-materials]
You can build a fully custom material node tree. Just add one [Texture Logic](/blender-addons/character-dna/0.15.1/terminology#texture-logic) node to the graph (`Add > Rig Logic > Head Texture Logic` in Blender's Shader Editor) and link your material in the [Rig Instance](/blender-addons/character-dna/0.15.1/free-features/rig-instances) outputs.
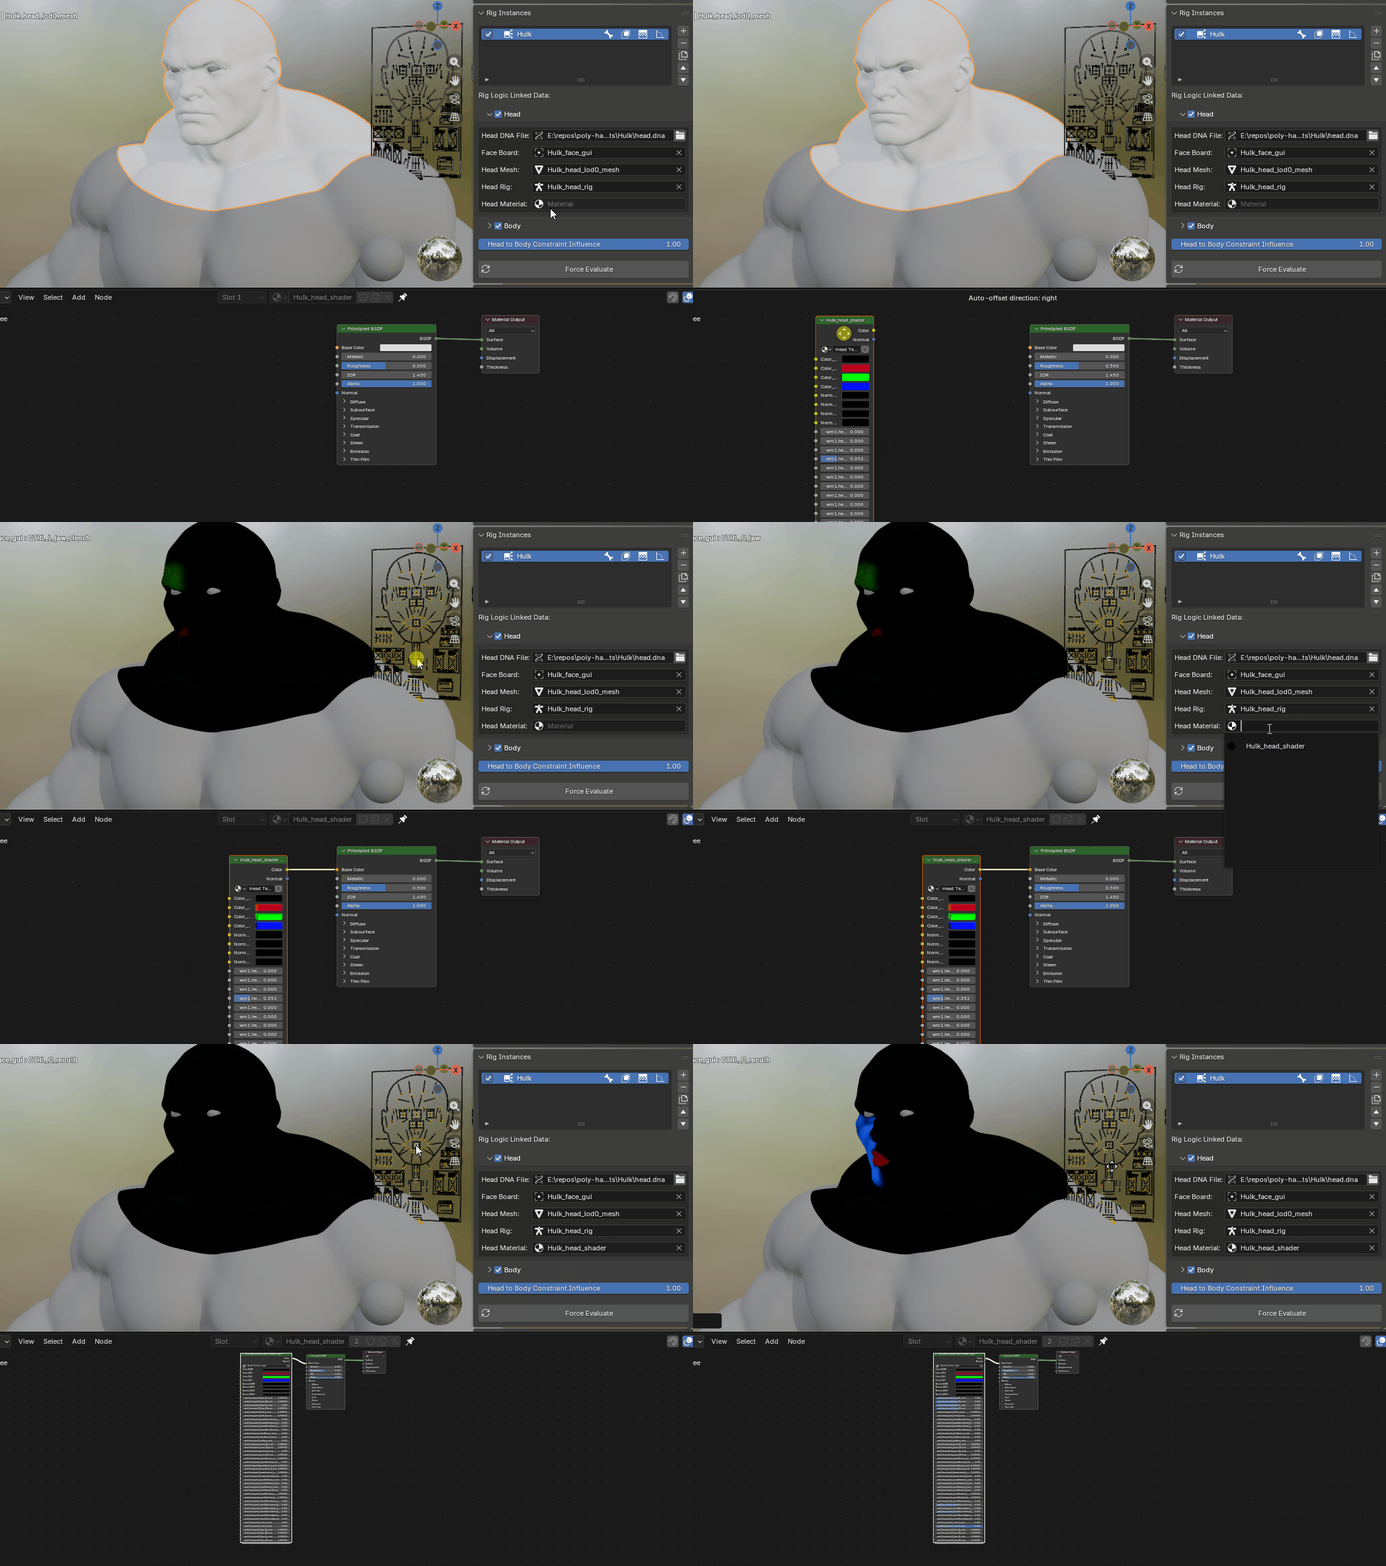
With that connected, RigLogic updates the wrinkle map masks for you as the GUI controls are evaluated.
## Importing Textures [#importing-textures]
When importing or converting a mesh, you can set the `Maps` folder location. By default, if a `Maps` folder sits alongside the `.dna` file, the importer uses it; otherwise, point it at your folder.
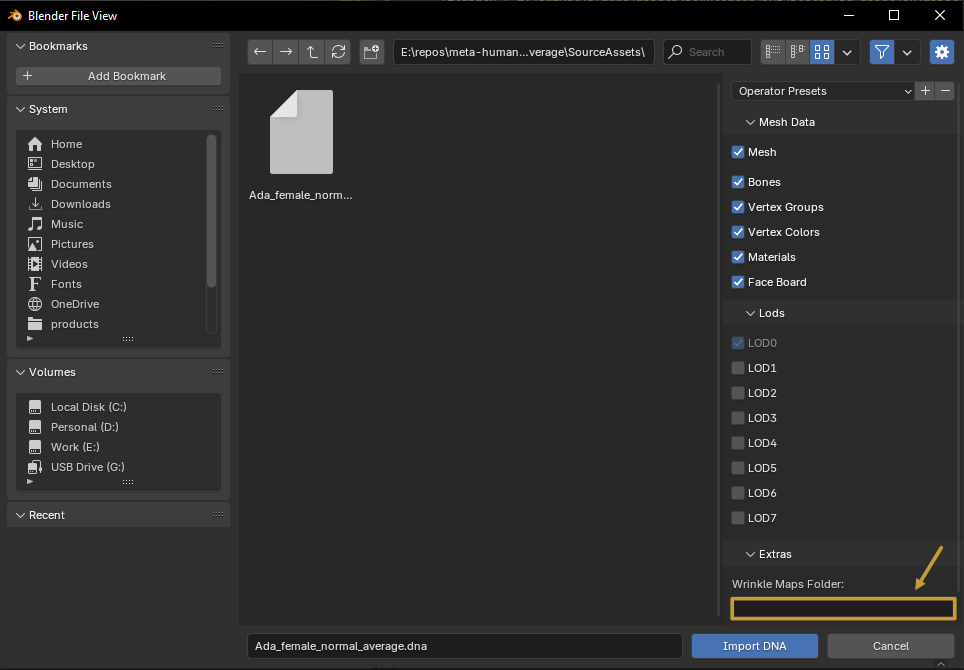
The importer links any `.tga` or `.png` textures to the [Texture Logic](/blender-addons/character-dna/0.15.1/terminology#texture-logic) node inputs that follow one of these naming patterns:
### Pattern 1 [#pattern-1]
| Texture File | Maps To |
| ------------------------------- | ----------- |
| Head_Basecolor.png | Color_MAIN |
| Head_Basecolor_Animated_CM1.png | Color_CM1 |
| Head_Basecolor_Animated_CM2.png | Color_CM2 |
| Head_Basecolor_Animated_CM3.png | Color_CM3 |
| Head_Normal.png | Normal_MAIN |
| Head_Normal_Animated_WM1.png | Normal_WM1 |
| Head_Normal_Animated_WM2.png | Normal_WM2 |
| Head_Normal_Animated_WM3.png | Normal_WM3 |
### Pattern 2 [#pattern-2]
| Texture File | Maps To |
| --------------- | ----------- |
| Color_MAIN.tga | Color_MAIN |
| Color_CM1.tga | Color_CM1 |
| Color_CM2.tga | Color_CM2 |
| Color_CM3.tga | Color_CM3 |
| Normal_MAIN.tga | Normal_MAIN |
| Normal_WM1.tga | Normal_WM1 |
| Normal_WM2.tga | Normal_WM2 |
| Normal_WM3.tga | Normal_WM3 |
### Pattern 3 [#pattern-3]
| Texture File | Maps To |
| ----------------------- | ----------- |
| head_color_map.tga | Color_MAIN |
| head_cm1_color_map.tga | Color_CM1 |
| head_cm2_color_map.tga | Color_CM2 |
| head_cm3_color_map.tga | Color_CM3 |
| head_normal_map.tga | Normal_MAIN |
| head_wm1_normal_map.tga | Normal_WM1 |
| head_wm2_normal_map.tga | Normal_WM2 |
| head_wm3_normal_map.tga | Normal_WM3 |
---
# Mesh Wrapping
Prepare a custom head for the Converter by wrapping it to the MetaHuman topology and UV layout.
Canonical URL: https://docs.polyhammer.com/blender-addons/character-dna/0.15.1/workflows/mesh-wrapping
Product: character-dna
Version: 0.15.1
Channel: production
Updated: 2026-11-21T13:45:20Z
Documentation source: initial main snapshot approved 2026-11-21T13:45:20Z
Documentation commit: 3533cd1260a9bd4b2806aaa4c64ead70766a1674
Release tag commit: 71125e9857db2b5a8ffa9426cc1f769d13017fd5
Owner-approved migration baseline: use current main documentation for the current stable release once; all subsequent releases use their tag snapshots.
To convert a custom head into a MetaHuman DNA with the [Converter](/blender-addons/character-dna/0.15.1/pro-features/converter), your mesh must share the MetaHuman topology and UV layout. **Wrapping** is how you get there: you deform a copy of the base MetaHuman head and body meshes so they conform to your scan, sculpt, or alternative topology.
## Why Wrap? [#why-wrap]
The [DNA auto-fitting](/blender-addons/character-dna/0.15.1/pro-features/converter) algorithm is **UV based**. It only produces a correct fit when your mesh uses the base MetaHuman UV layout with **no overlapping or extra islands, or distorted points**.
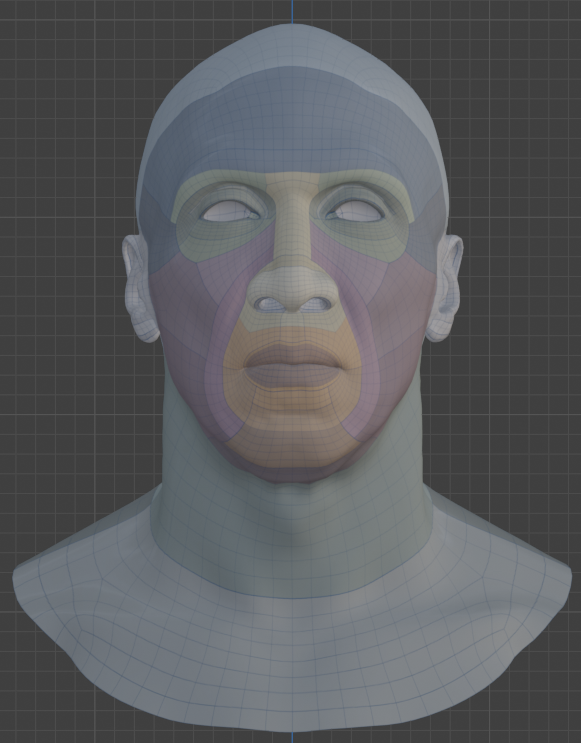
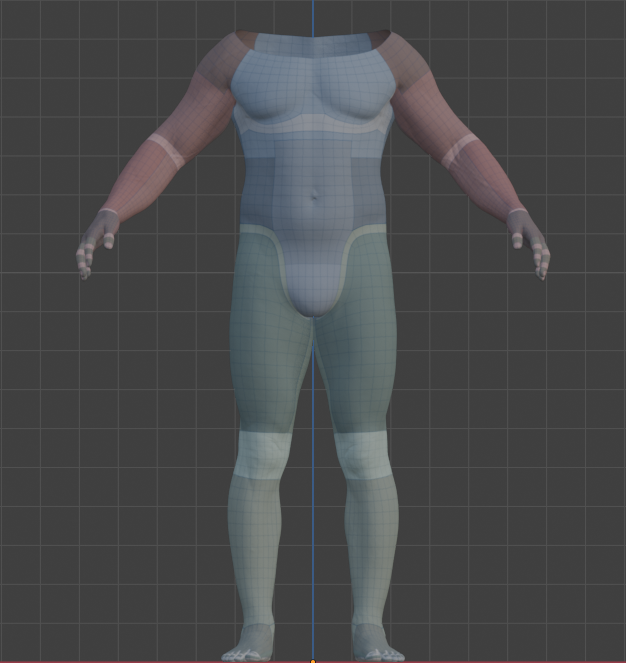
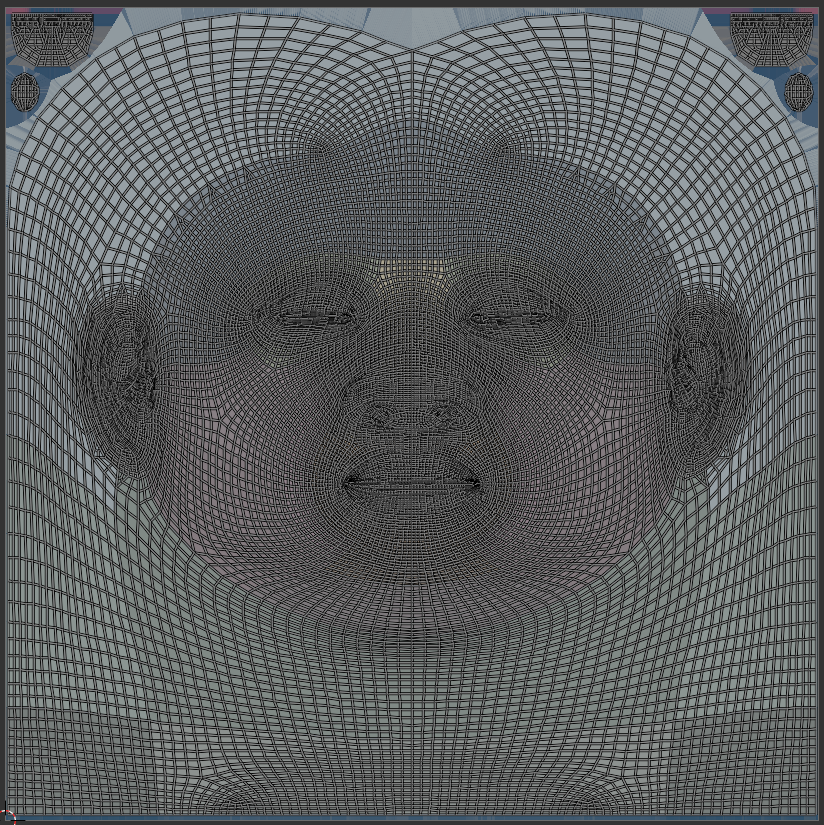
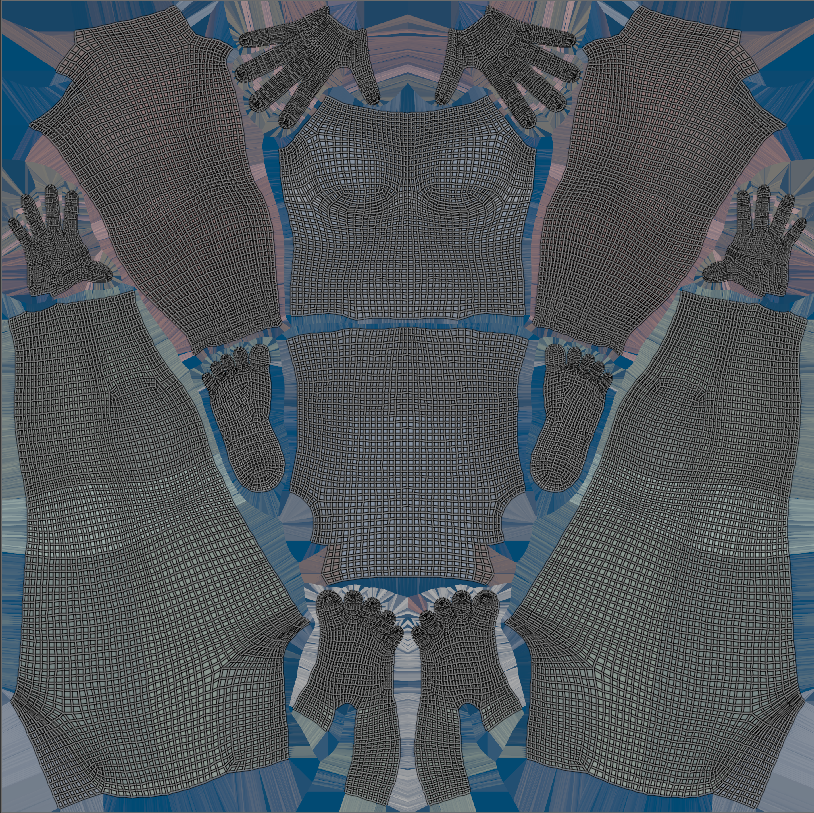
Wrapping preserves that layout because you start from the base MetaHuman head and body meshes and only move their vertices. Never change their vertex count or UVs.
## Methods [#methods]
There are several ways to produce a wrapped, topology-matched head and body. Pick whichever fits your pipeline.
### 1. Face Form Wrap [#1-face-form-wrap]
A dedicated wrapping tool that is a fast and accurate way to conform the base MetaHuman head and body meshes onto your target scan or sculpt while preserving topology and UVs.
[Video tutorial: Face Form Wrap tutorial](https://www.youtube.com/embed/813BCbIwGiE)
### 2. Mesh to MetaHuman (Unreal Engine 5.8) [#2-mesh-to-metahuman-unreal-engine-58]
Epic's built-in **Mesh to MetaHuman** tool fits a MetaHuman topology onto your custom mesh directly in Unreal, then hands it back through MetaHuman Creator. Export the resulting DNA and bring it into Blender.
- [MetaHuman Creator from custom mesh tool in Unreal Engine](https://dev.epicgames.com/documentation/metahuman/metahuman-creator-from-custom-mesh-tool-in-unreal-engine)
### 3. Blender (Proportional Editing, Sculpt, Shrinkwrap) [#3-blender-proportional-editing-sculpt-shrinkwrap]
Wrap entirely in Blender by reshaping a copy of the base MetaHuman head and body:
1. Use **Proportional Editing** to block in the overall shape toward your target.
2. Refine with **Sculpt** brushes for finer detail.
3. Systematically add **[Shrinkwrap modifiers](https://docs.blender.org/manual/en/latest/modeling/modifiers/deform/shrinkwrap.html)** targeting your reference mesh, scoping each to a **vertex group** so you can conform specific regions (cheeks, brow, jaw) without disturbing the rest. Apply as you go.
You can even combine these methods to achieve your desired result, using free or paid tools as needed.
## Convert [#convert]
Once you have a wrapped head and body mesh, run **Convert to DNA**.
Wrapping the character in a neutral position with the mouth slightly open and eyes slightly closed can be ideal for transferring textures or vertex group data. You can then edit the `default` item in the [Raw Editor](/blender-addons/character-dna/0.15.1/pro-features/raw-editor) to close the mouth and fully open the eyes, defining the character's rest pose.